> ## Documentation Index
> Fetch the complete documentation index at: https://aipro.placetel.de/docs/llms.txt
> Use this file to discover all available pages before exploring further.
# Custom SIP Connection
> Set up your own SIP trunks and phone numbers.
With the **custom SIP connection**, customers with the SIP feature enabled can connect their existing telephony infrastructure to Placetel AI. Incoming calls are forwarded from your own SIP provider to Placetel AI, and your own phone numbers can be assigned to a voice agent.
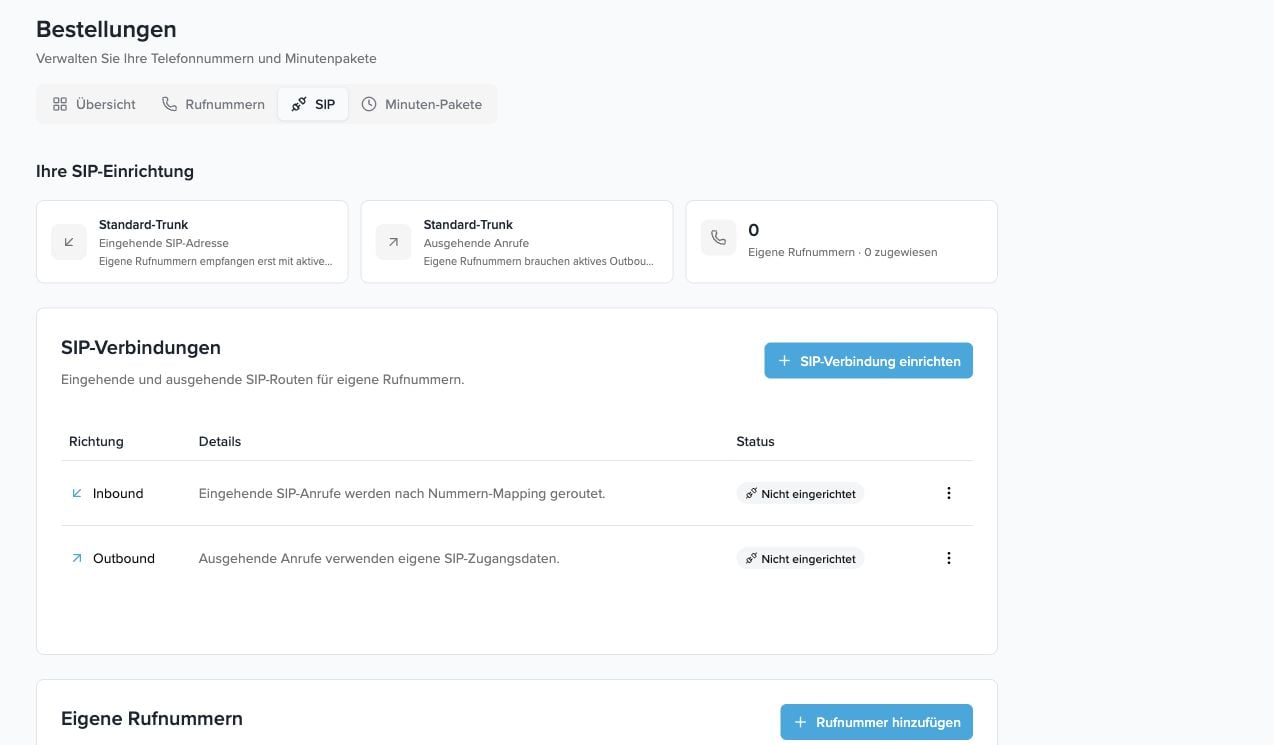 This feature is primarily intended for standalone customers who use their own SIP provider or SIP trunk. Placetel customers can also request and have the feature enabled if needed. Managed phone numbers from the Placetel inventory remain in the **Phone numbers** area.
## Overview
The SIP setup consists of three parts:
* **Custom SIP trunk**: the inbound SIP address to which your SIP provider forwards calls.
* **Custom phone numbers**: phone numbers or SIP identifiers that come in via your own trunk and are assigned to a voice agent.
* **Outbound connection**: optional SIP credentials for outbound calls and warm transfers via your own provider.
If only the inbound trunk is active, inbound BYOS calls can be processed. If only the outbound trunk is active, outbound calls and warm transfers can run via your own provider. Both directions can be set up independently of each other.
## SIP address
Every enabled account receives its own SIP address. This address is shown in the **SIP** area and can be copied directly.
```text theme={null}
sip:in-abc1234567890abcdef1234.aisip.placetel.de
```
Enter this SIP address at your SIP provider as the destination for incoming calls. With providers like Twilio, this typically corresponds to the **Origination URI** of the SIP trunk.
Use the SIP address only for the associated account. The address contains an account-specific token and should not be shared between customers or tenants.
## Activating the inbound SIP trunk
Open **Phone numbers → SIP** and select the inbound connection in the **SIP connections** area.
This feature is primarily intended for standalone customers who use their own SIP provider or SIP trunk. Placetel customers can also request and have the feature enabled if needed. Managed phone numbers from the Placetel inventory remain in the **Phone numbers** area.
## Overview
The SIP setup consists of three parts:
* **Custom SIP trunk**: the inbound SIP address to which your SIP provider forwards calls.
* **Custom phone numbers**: phone numbers or SIP identifiers that come in via your own trunk and are assigned to a voice agent.
* **Outbound connection**: optional SIP credentials for outbound calls and warm transfers via your own provider.
If only the inbound trunk is active, inbound BYOS calls can be processed. If only the outbound trunk is active, outbound calls and warm transfers can run via your own provider. Both directions can be set up independently of each other.
## SIP address
Every enabled account receives its own SIP address. This address is shown in the **SIP** area and can be copied directly.
```text theme={null}
sip:in-abc1234567890abcdef1234.aisip.placetel.de
```
Enter this SIP address at your SIP provider as the destination for incoming calls. With providers like Twilio, this typically corresponds to the **Origination URI** of the SIP trunk.
Use the SIP address only for the associated account. The address contains an account-specific token and should not be shared between customers or tenants.
## Activating the inbound SIP trunk
Open **Phone numbers → SIP** and select the inbound connection in the **SIP connections** area.
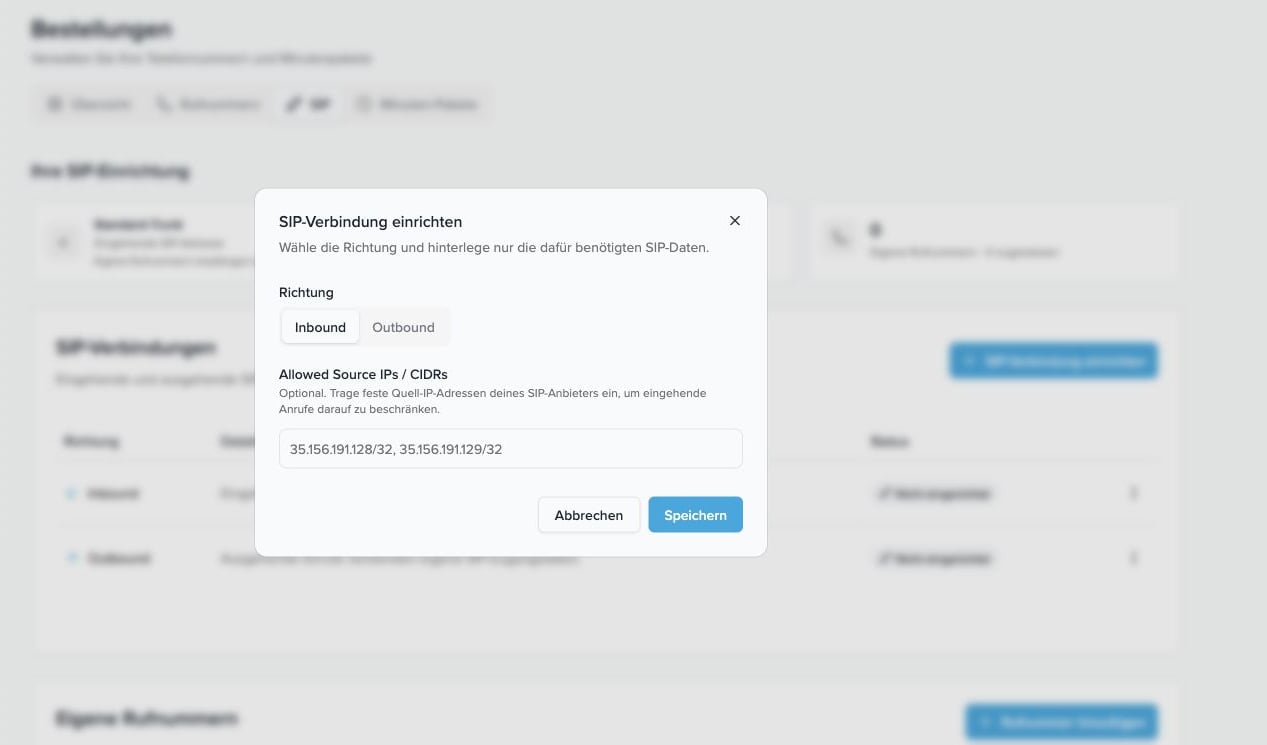 Optionally, you can enter fixed source IP addresses of your SIP provider under **Allowed Source IPs / CIDRs**. If this field is set, Placetel AI only accepts inbound SIP calls from these IP addresses.
Examples:
```text theme={null}
35.156.191.128/32
35.156.191.128/32, 35.156.191.129/32
```
Leave the field empty if your provider does not offer fixed source IP addresses.
## Adding a custom phone number
A custom phone number describes which called number or SIP identifier is routed via your own trunk to which voice agent.
Optionally, you can enter fixed source IP addresses of your SIP provider under **Allowed Source IPs / CIDRs**. If this field is set, Placetel AI only accepts inbound SIP calls from these IP addresses.
Examples:
```text theme={null}
35.156.191.128/32
35.156.191.128/32, 35.156.191.129/32
```
Leave the field empty if your provider does not offer fixed source IP addresses.
## Adding a custom phone number
A custom phone number describes which called number or SIP identifier is routed via your own trunk to which voice agent.
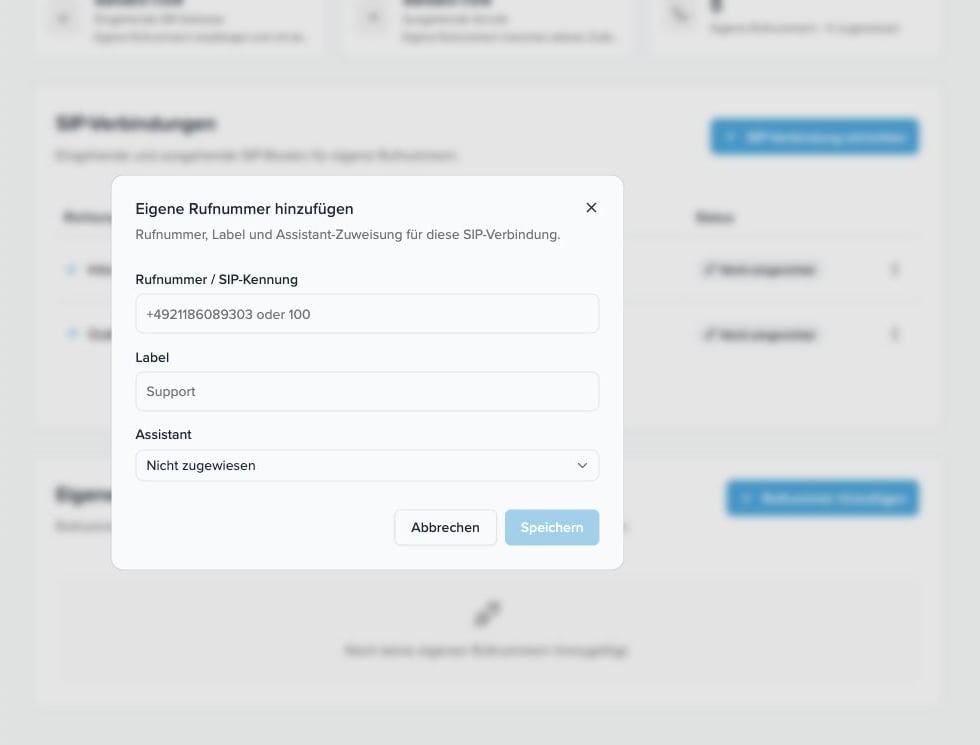 1. Open **Phone numbers → SIP**.
2. Click **Add phone number**.
3. Enter the phone number in international format, for example `+491234567890`.
4. Optionally, assign a label.
5. Select the voice agent that should answer calls on this number.
6. Save the phone number.
You can also save custom phone numbers without immediately assigning them to a voice agent. Without an assignment, the phone number is not actively routed to an agent.
## Setting up the outbound connection
For outbound BYOS calls and warm transfers, Placetel AI needs the SIP credentials of your provider.
1. Open **Phone numbers → SIP**.
2. Click **Add phone number**.
3. Enter the phone number in international format, for example `+491234567890`.
4. Optionally, assign a label.
5. Select the voice agent that should answer calls on this number.
6. Save the phone number.
You can also save custom phone numbers without immediately assigning them to a voice agent. Without an assignment, the phone number is not actively routed to an agent.
## Setting up the outbound connection
For outbound BYOS calls and warm transfers, Placetel AI needs the SIP credentials of your provider.
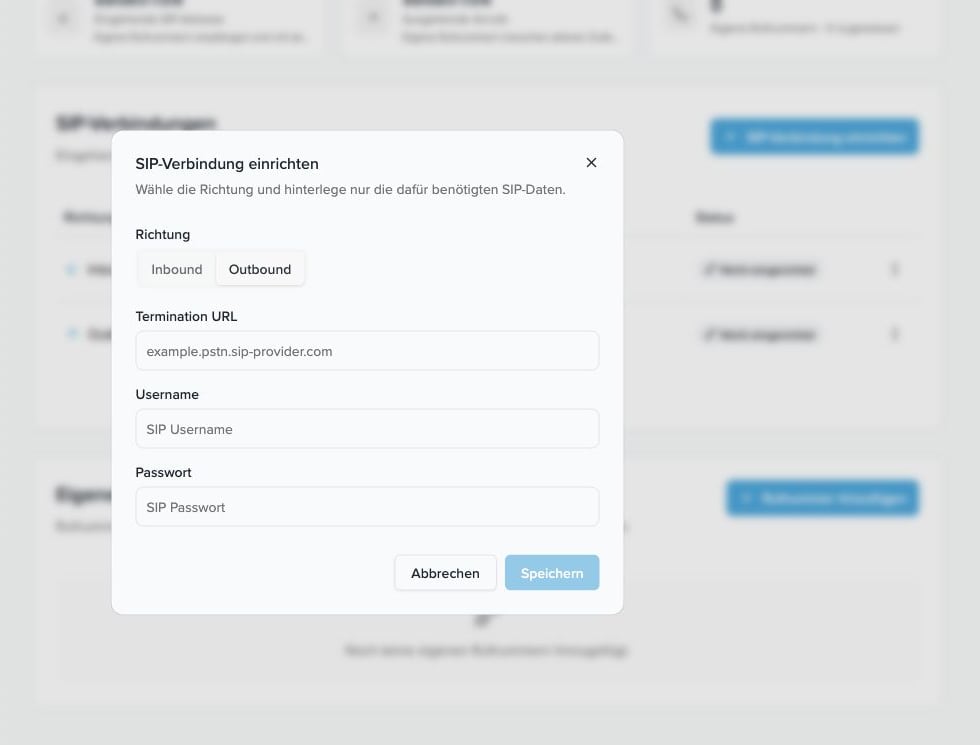 The most important fields are:
* **Termination URL**: your provider's SIP domain, for example `example.pstn.sip-provider.com`.
* **Username**: SIP username for authentication.
* **Password**: SIP password for authentication.
The inbound SIP address and the outbound termination URL are different things. The inbound SIP address points to Placetel AI. The termination URL points to your SIP provider.
## Outbound calls with your own phone number
If you want to start outbound calls via your own SIP provider, first set up the **outbound connection** and then add the phone number that should be shown to the person being called.
1. Activate the outbound SIP connection.
2. Enter the SIP credentials from your provider.
3. Add the phone number under **Custom phone numbers**.
4. Assign this phone number to the voice agent that should handle the outbound calls.
5. Start the call under **Outbound Calls** with that exact voice agent.
For outbound BYOS calls, the voice agent uses the custom phone number assigned to it under **Custom phone numbers**. In this case, you do not need to enter a separate caller number.
## Understanding the status
* **Inbound active**: inbound calls via your own SIP address can be processed.
* **Inbound inactive or not set up**: custom phone numbers remain saved, but inbound BYOS calls are not processed via your own SIP address. Existing Placetel phone numbers and standard telephony paths are not affected.
* **Outbound active**: outbound calls and warm transfers can run via your own SIP provider.
* **Outbound not set up**: outbound BYOS calls are not active. Existing Placetel phone numbers and standard telephony paths are not affected.
## Example: Twilio Elastic SIP Trunk
Twilio Elastic SIP Trunking is a supported BYOS provider. The following steps show the typical flow in the Twilio Console.
The names of individual menu items in Twilio may differ slightly depending on region or Console version. What matters: **Origination URI** for inbound calls, **Termination SIP URI** and **Credential List** for outbound calls.
### 1. Create a SIP trunk
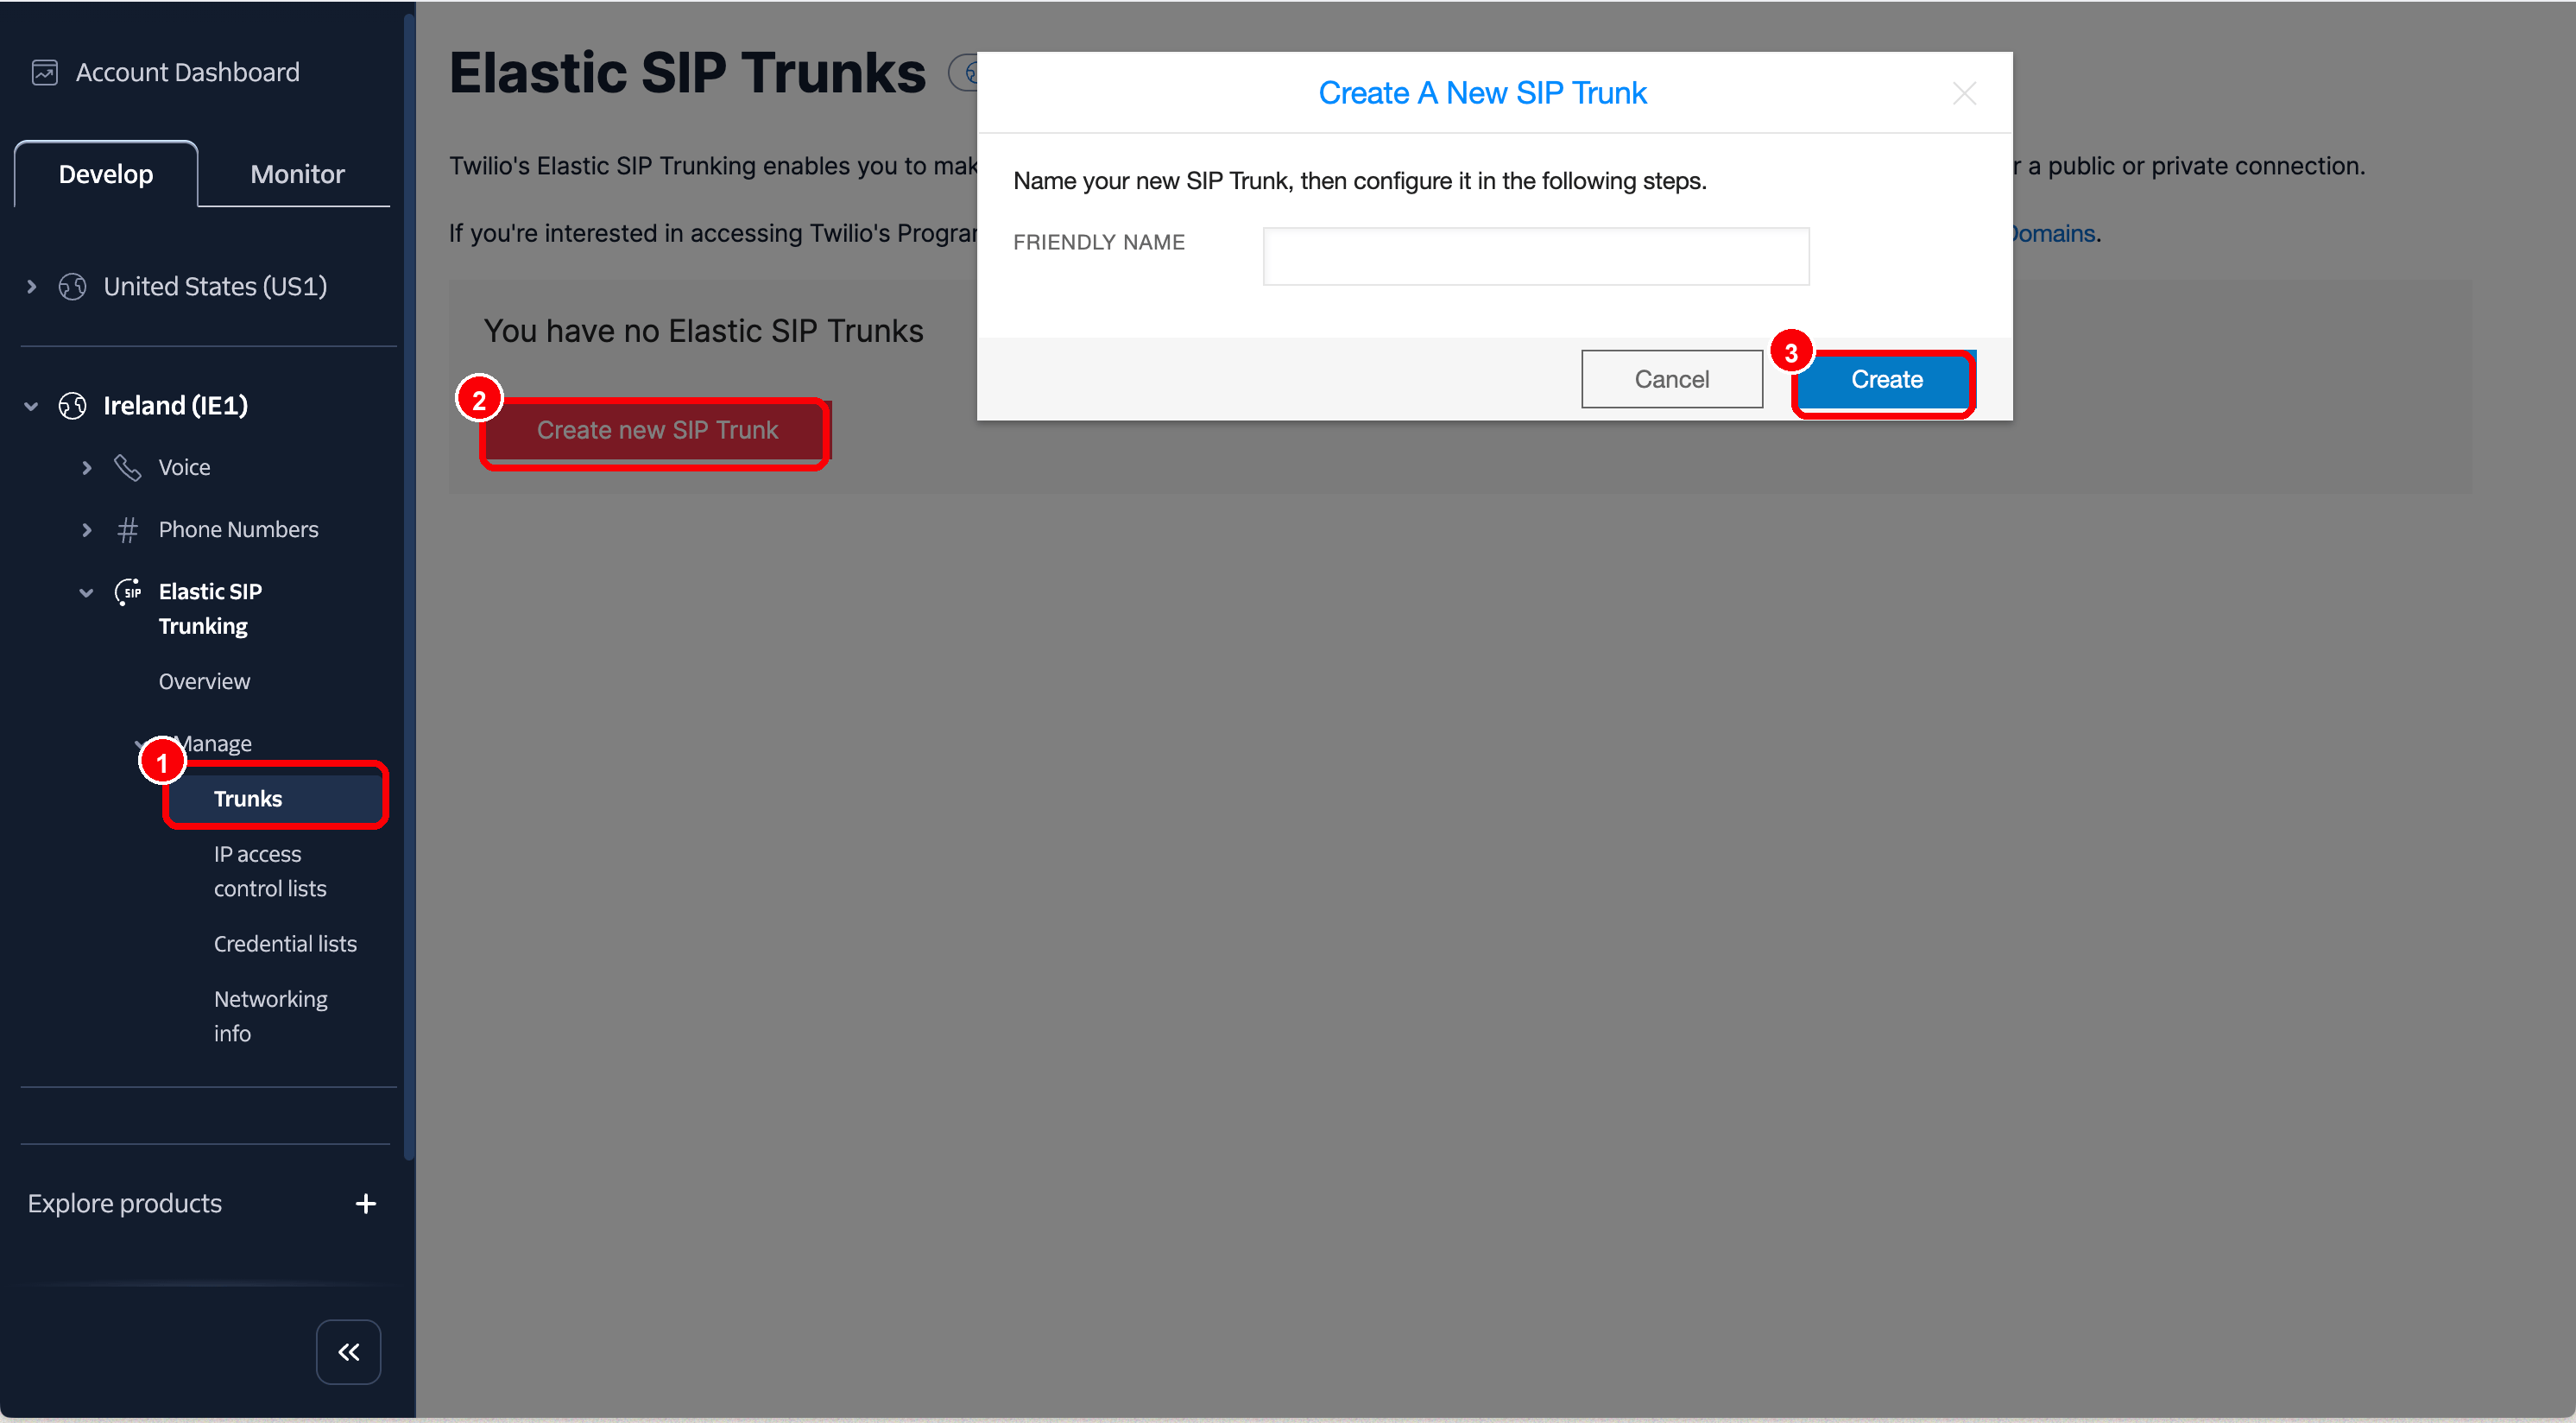
In the Twilio Console, open **Develop → Elastic SIP Trunking → Manage → Trunks** and create a new SIP trunk. Choose a unique name, for example `voice-agent`.
The most important fields are:
* **Termination URL**: your provider's SIP domain, for example `example.pstn.sip-provider.com`.
* **Username**: SIP username for authentication.
* **Password**: SIP password for authentication.
The inbound SIP address and the outbound termination URL are different things. The inbound SIP address points to Placetel AI. The termination URL points to your SIP provider.
## Outbound calls with your own phone number
If you want to start outbound calls via your own SIP provider, first set up the **outbound connection** and then add the phone number that should be shown to the person being called.
1. Activate the outbound SIP connection.
2. Enter the SIP credentials from your provider.
3. Add the phone number under **Custom phone numbers**.
4. Assign this phone number to the voice agent that should handle the outbound calls.
5. Start the call under **Outbound Calls** with that exact voice agent.
For outbound BYOS calls, the voice agent uses the custom phone number assigned to it under **Custom phone numbers**. In this case, you do not need to enter a separate caller number.
## Understanding the status
* **Inbound active**: inbound calls via your own SIP address can be processed.
* **Inbound inactive or not set up**: custom phone numbers remain saved, but inbound BYOS calls are not processed via your own SIP address. Existing Placetel phone numbers and standard telephony paths are not affected.
* **Outbound active**: outbound calls and warm transfers can run via your own SIP provider.
* **Outbound not set up**: outbound BYOS calls are not active. Existing Placetel phone numbers and standard telephony paths are not affected.
## Example: Twilio Elastic SIP Trunk
Twilio Elastic SIP Trunking is a supported BYOS provider. The following steps show the typical flow in the Twilio Console.
The names of individual menu items in Twilio may differ slightly depending on region or Console version. What matters: **Origination URI** for inbound calls, **Termination SIP URI** and **Credential List** for outbound calls.
### 1. Create a SIP trunk
In the Twilio Console, open **Develop → Elastic SIP Trunking → Manage → Trunks** and create a new SIP trunk. Choose a unique name, for example `voice-agent`.
 ### 2. Assign a Twilio phone number to the trunk
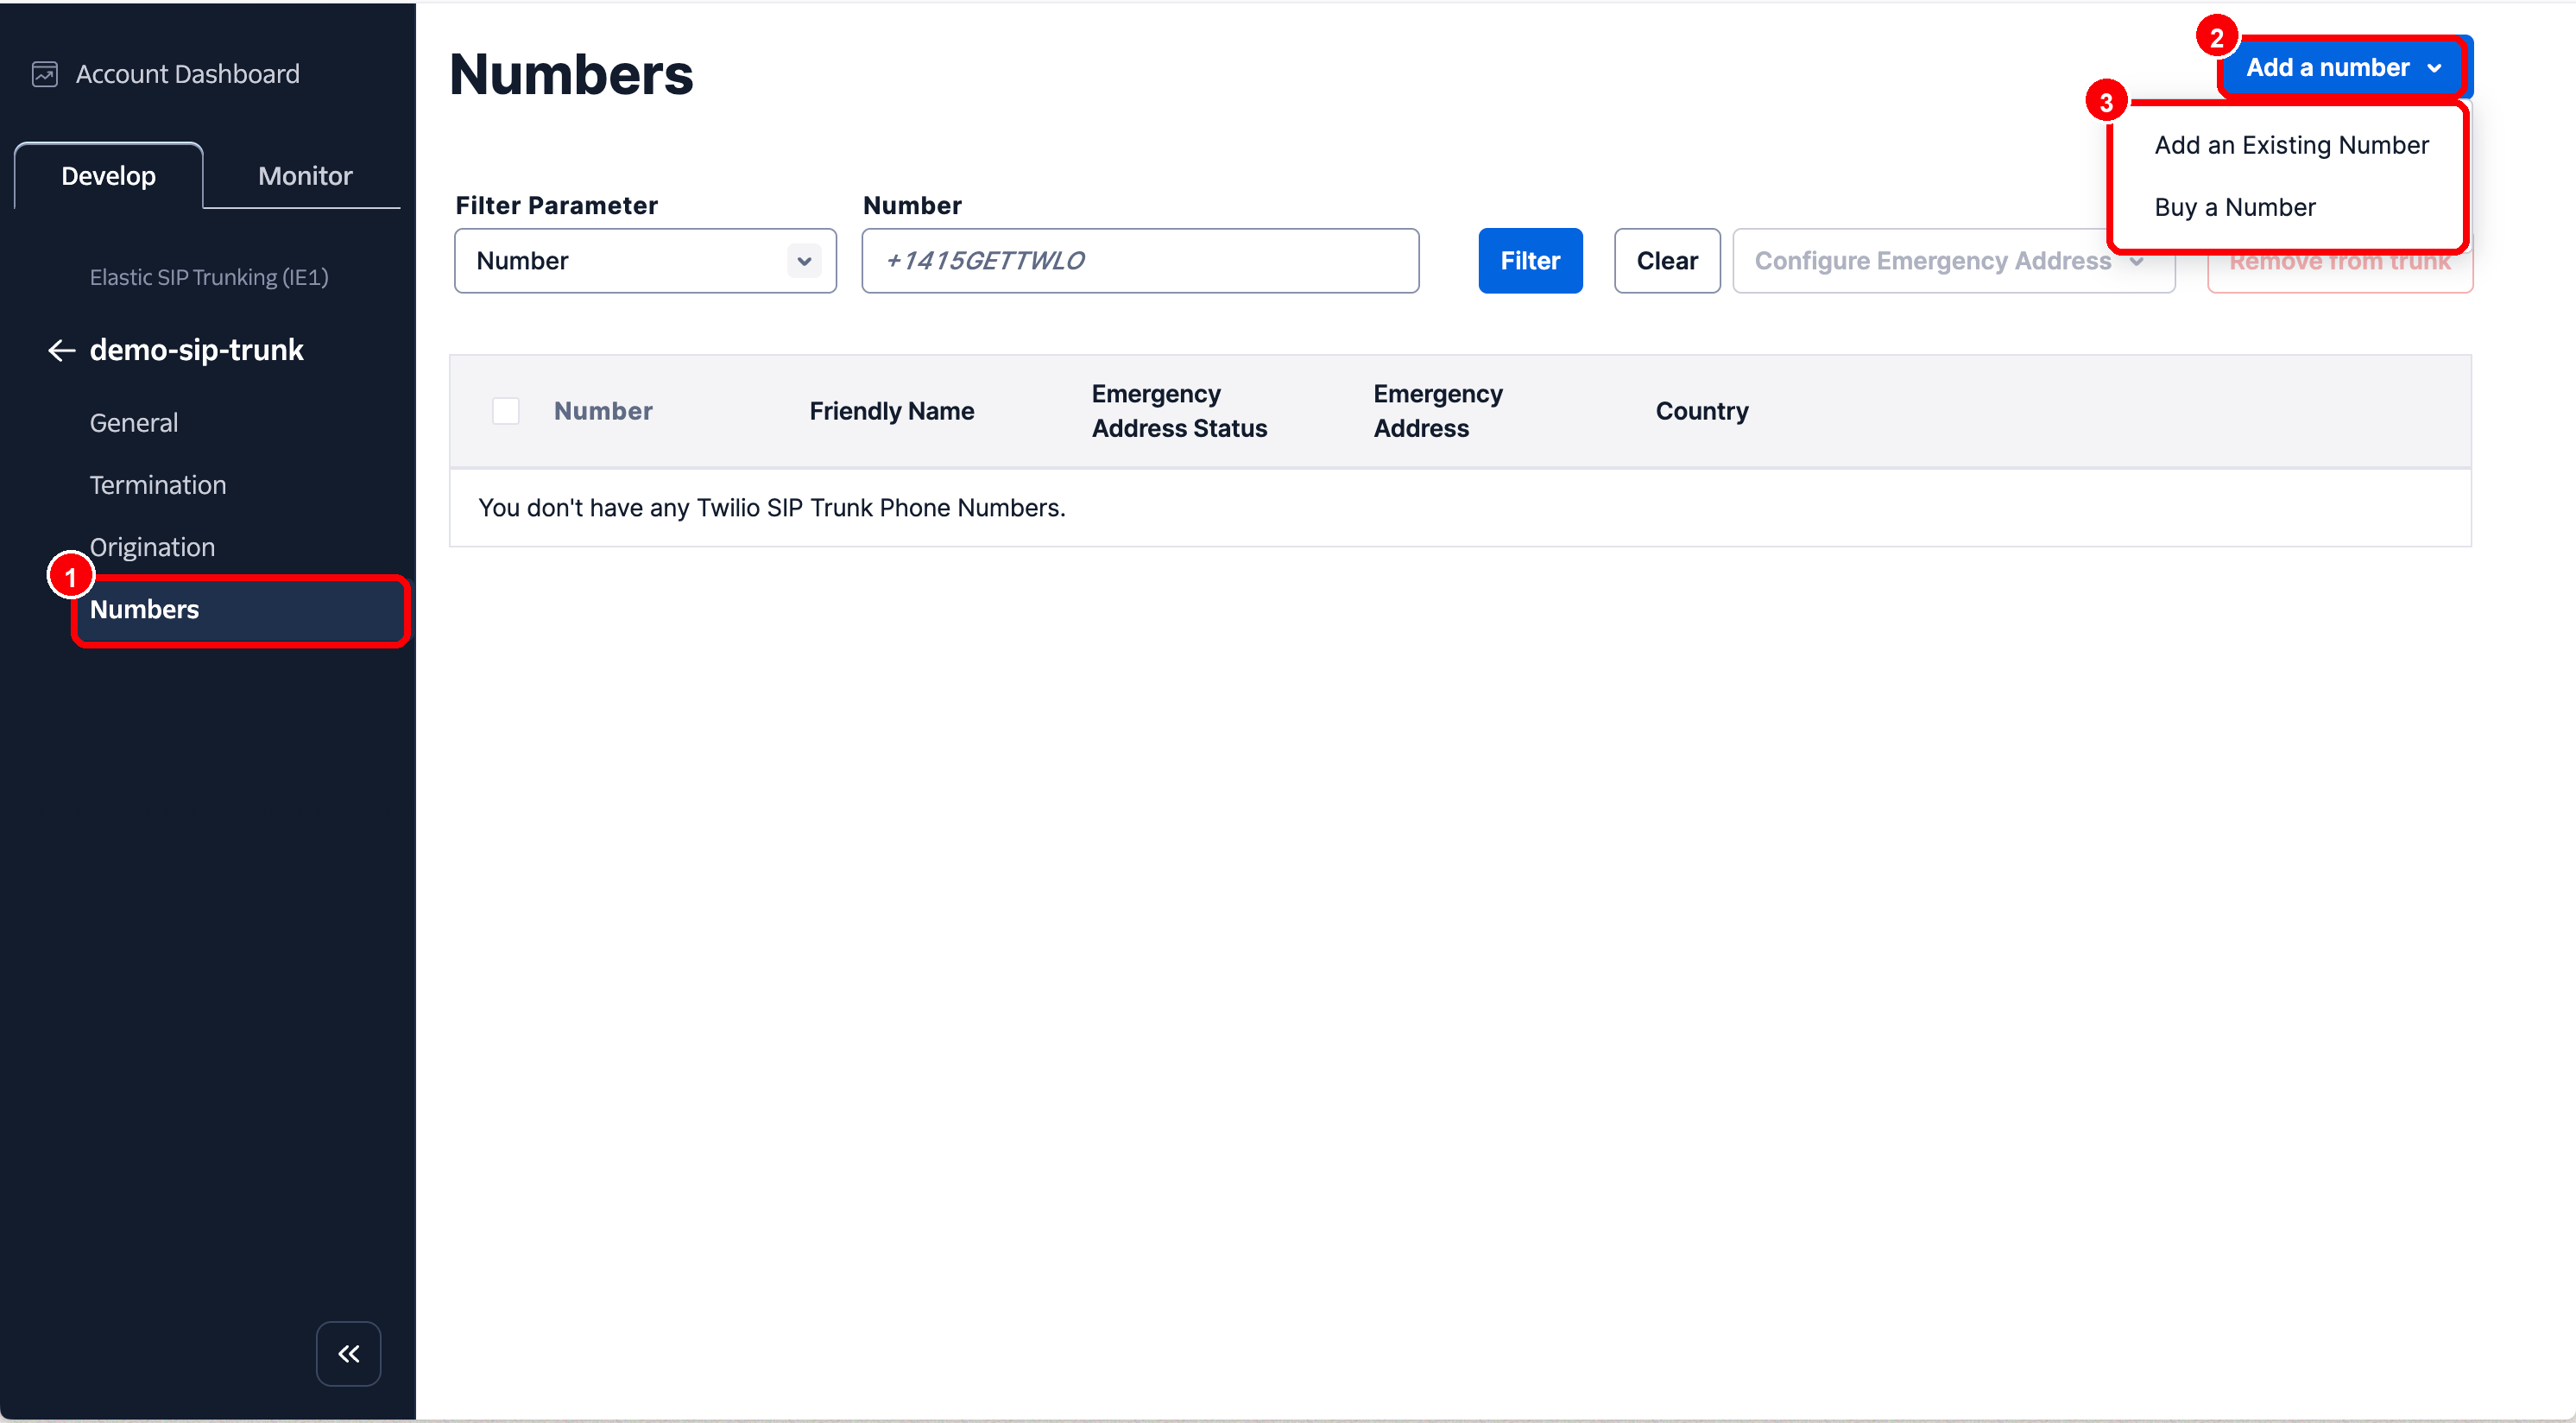
In the trunk, open the **Numbers** area. Via **Add a number → Add an Existing Number**, you can connect an existing Twilio phone number to the trunk.
### 2. Assign a Twilio phone number to the trunk
In the trunk, open the **Numbers** area. Via **Add a number → Add an Existing Number**, you can connect an existing Twilio phone number to the trunk.
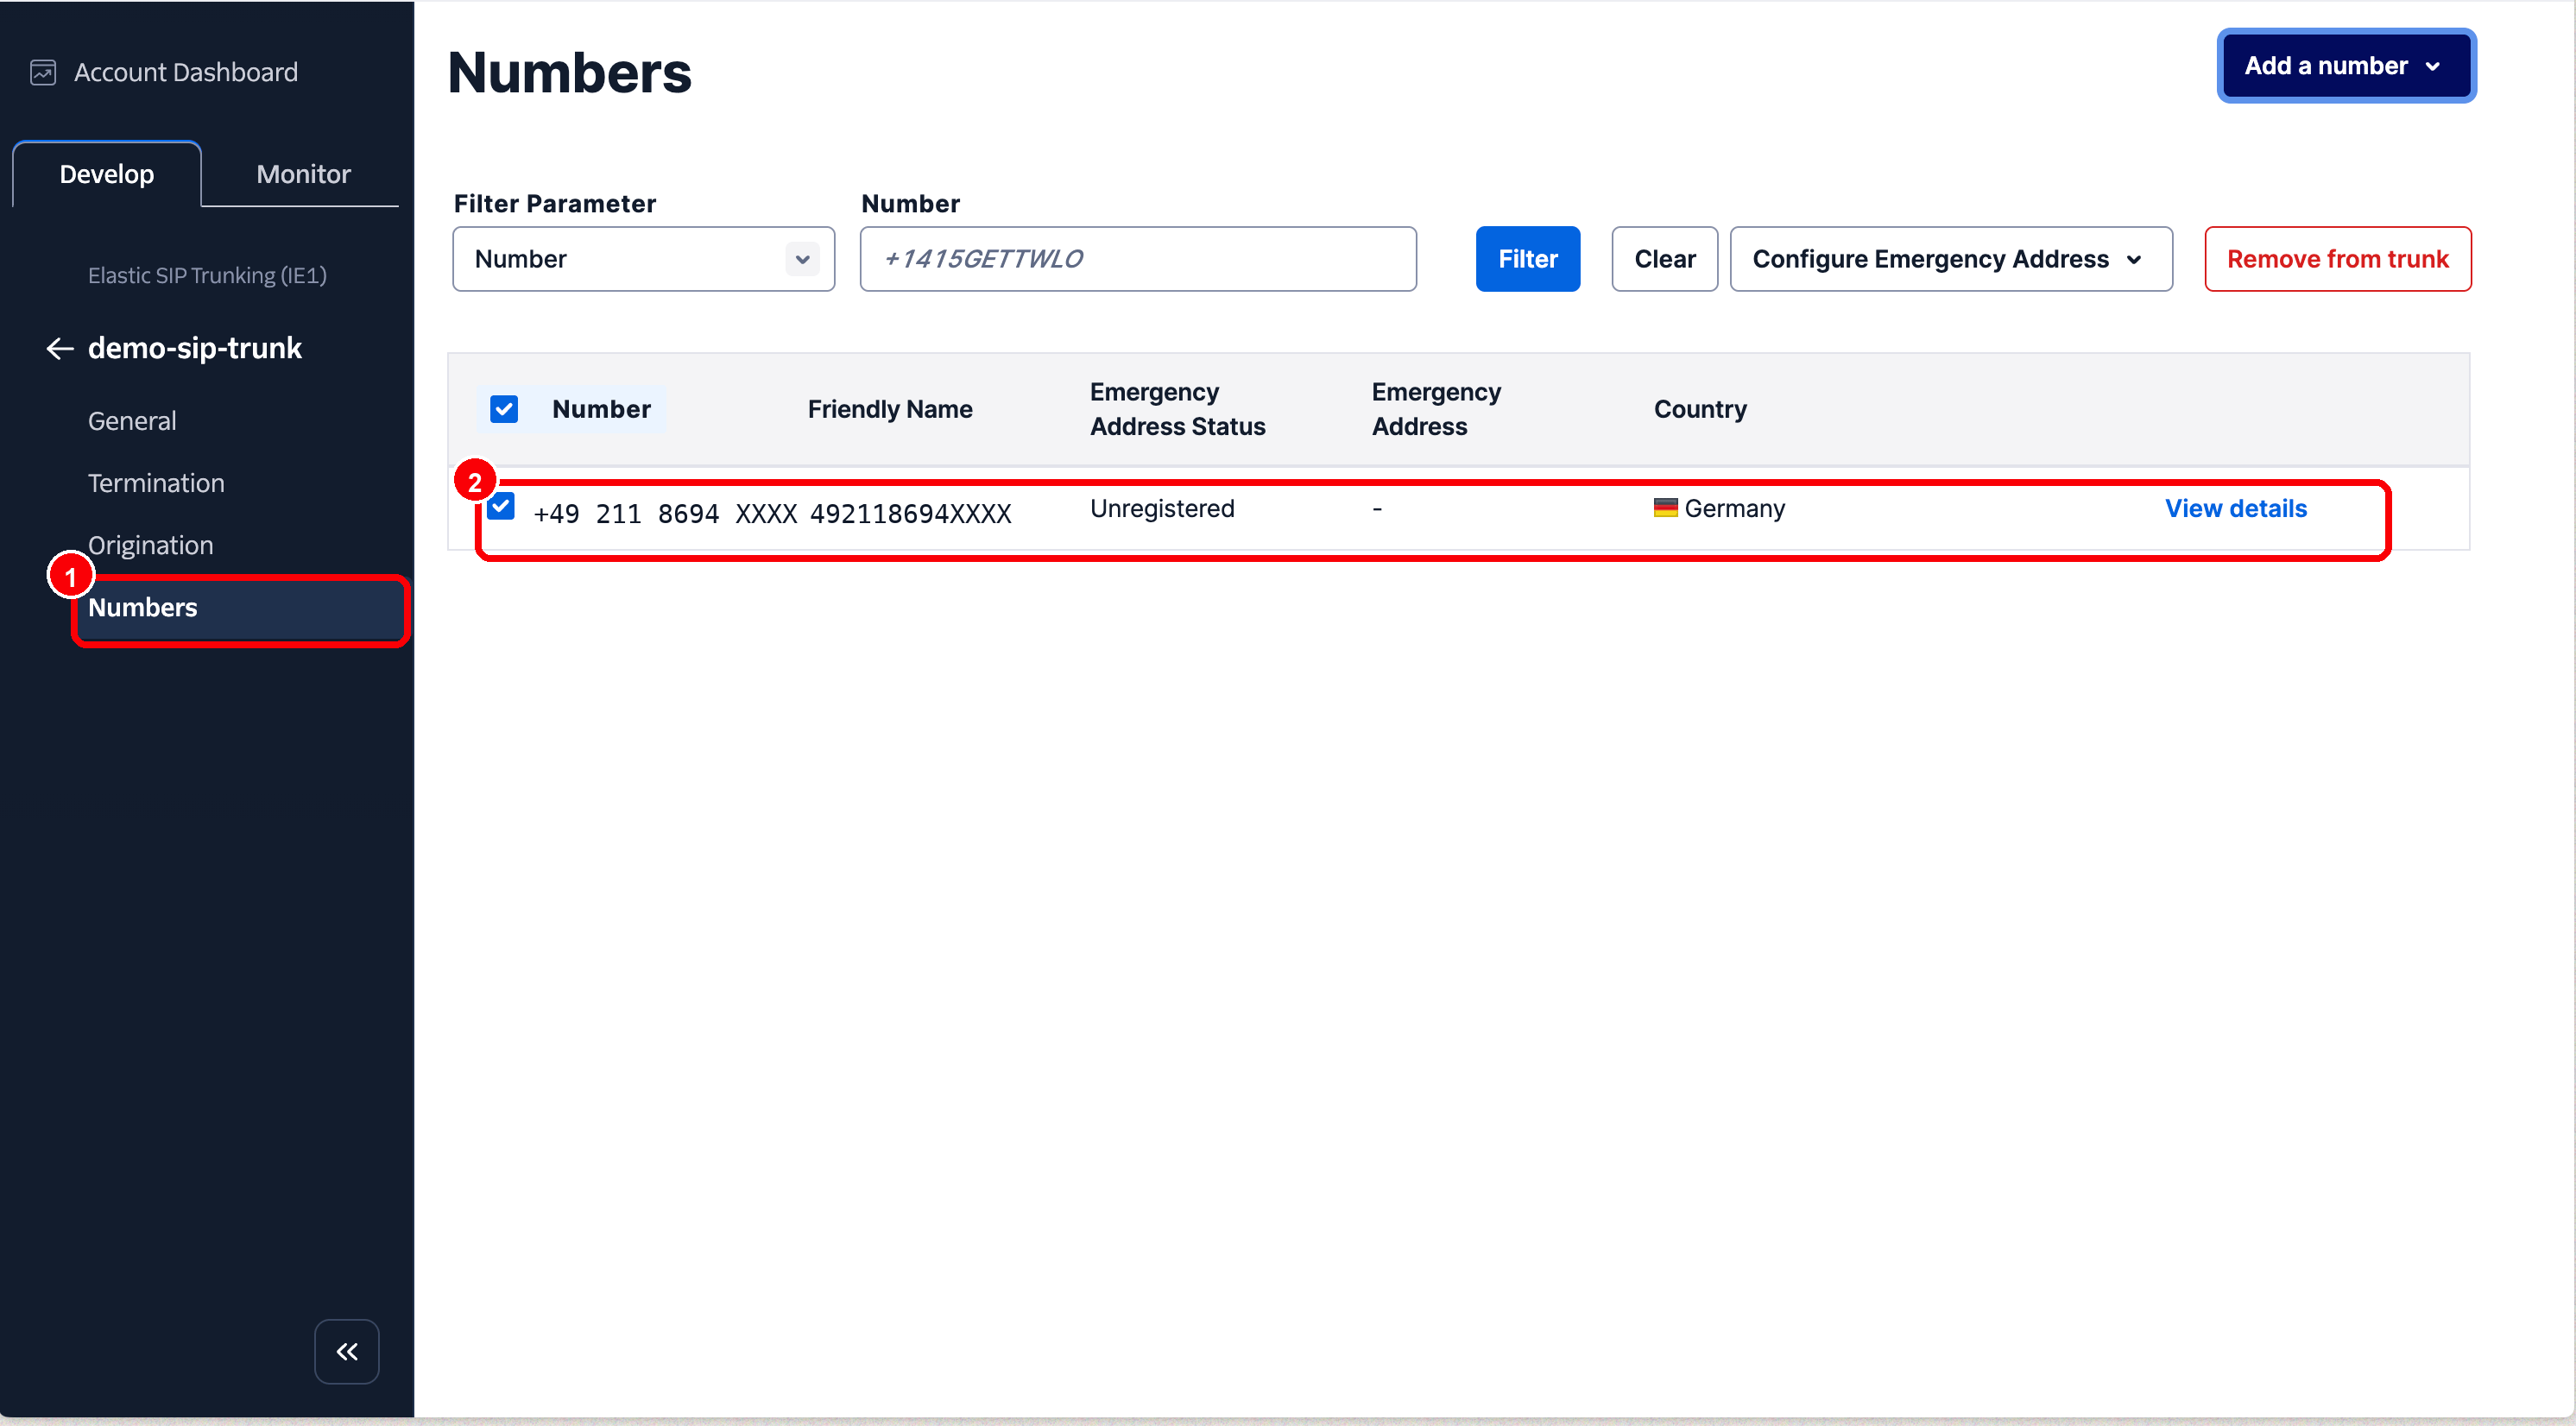
 Once the phone number is connected to the trunk, Twilio can forward inbound calls on this number to Placetel AI via the Origination URI.
 ### 3. Set the Origination URI
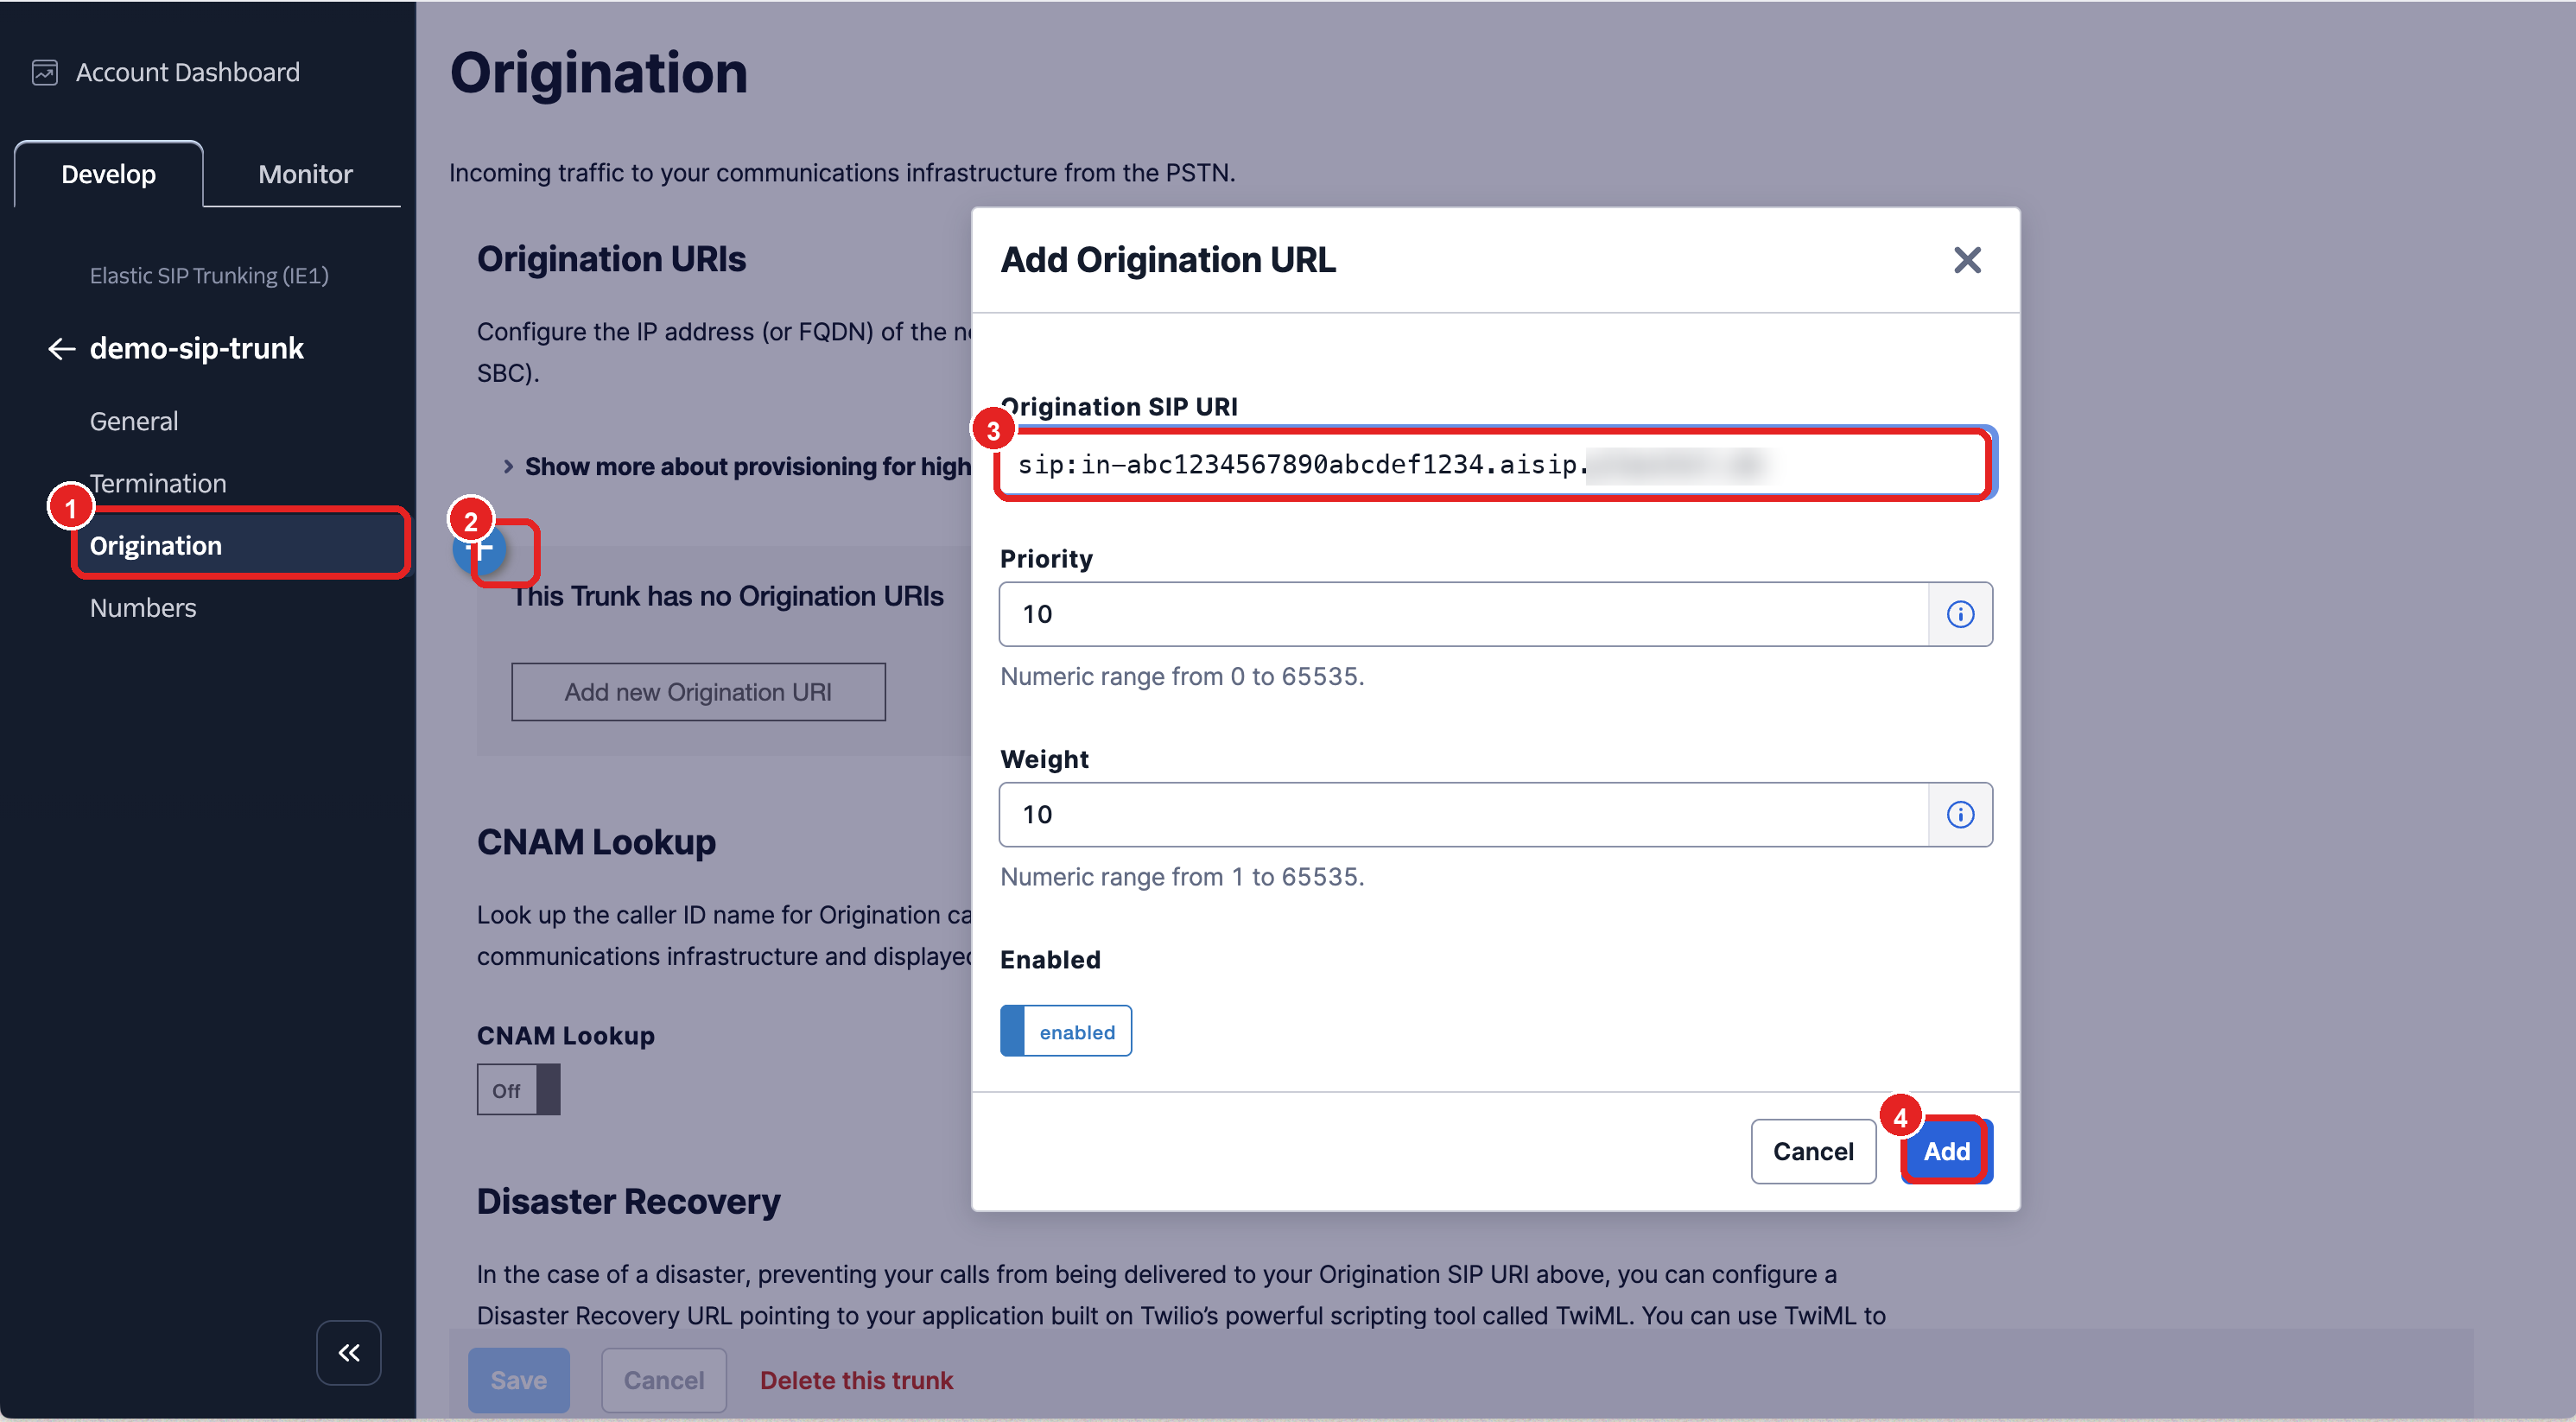
In the trunk, open the **Origination** area and enter the Placetel AI SIP address as the Origination URI:
```text theme={null}
sip:in-abc1234567890abcdef1234.aisip.placetel.de
```
Save the origination setting. After that, Twilio sends inbound calls on the connected phone number to Placetel AI.
### 3. Set the Origination URI
In the trunk, open the **Origination** area and enter the Placetel AI SIP address as the Origination URI:
```text theme={null}
sip:in-abc1234567890abcdef1234.aisip.placetel.de
```
Save the origination setting. After that, Twilio sends inbound calls on the connected phone number to Placetel AI.
 ### 4. Set up termination and SIP credentials
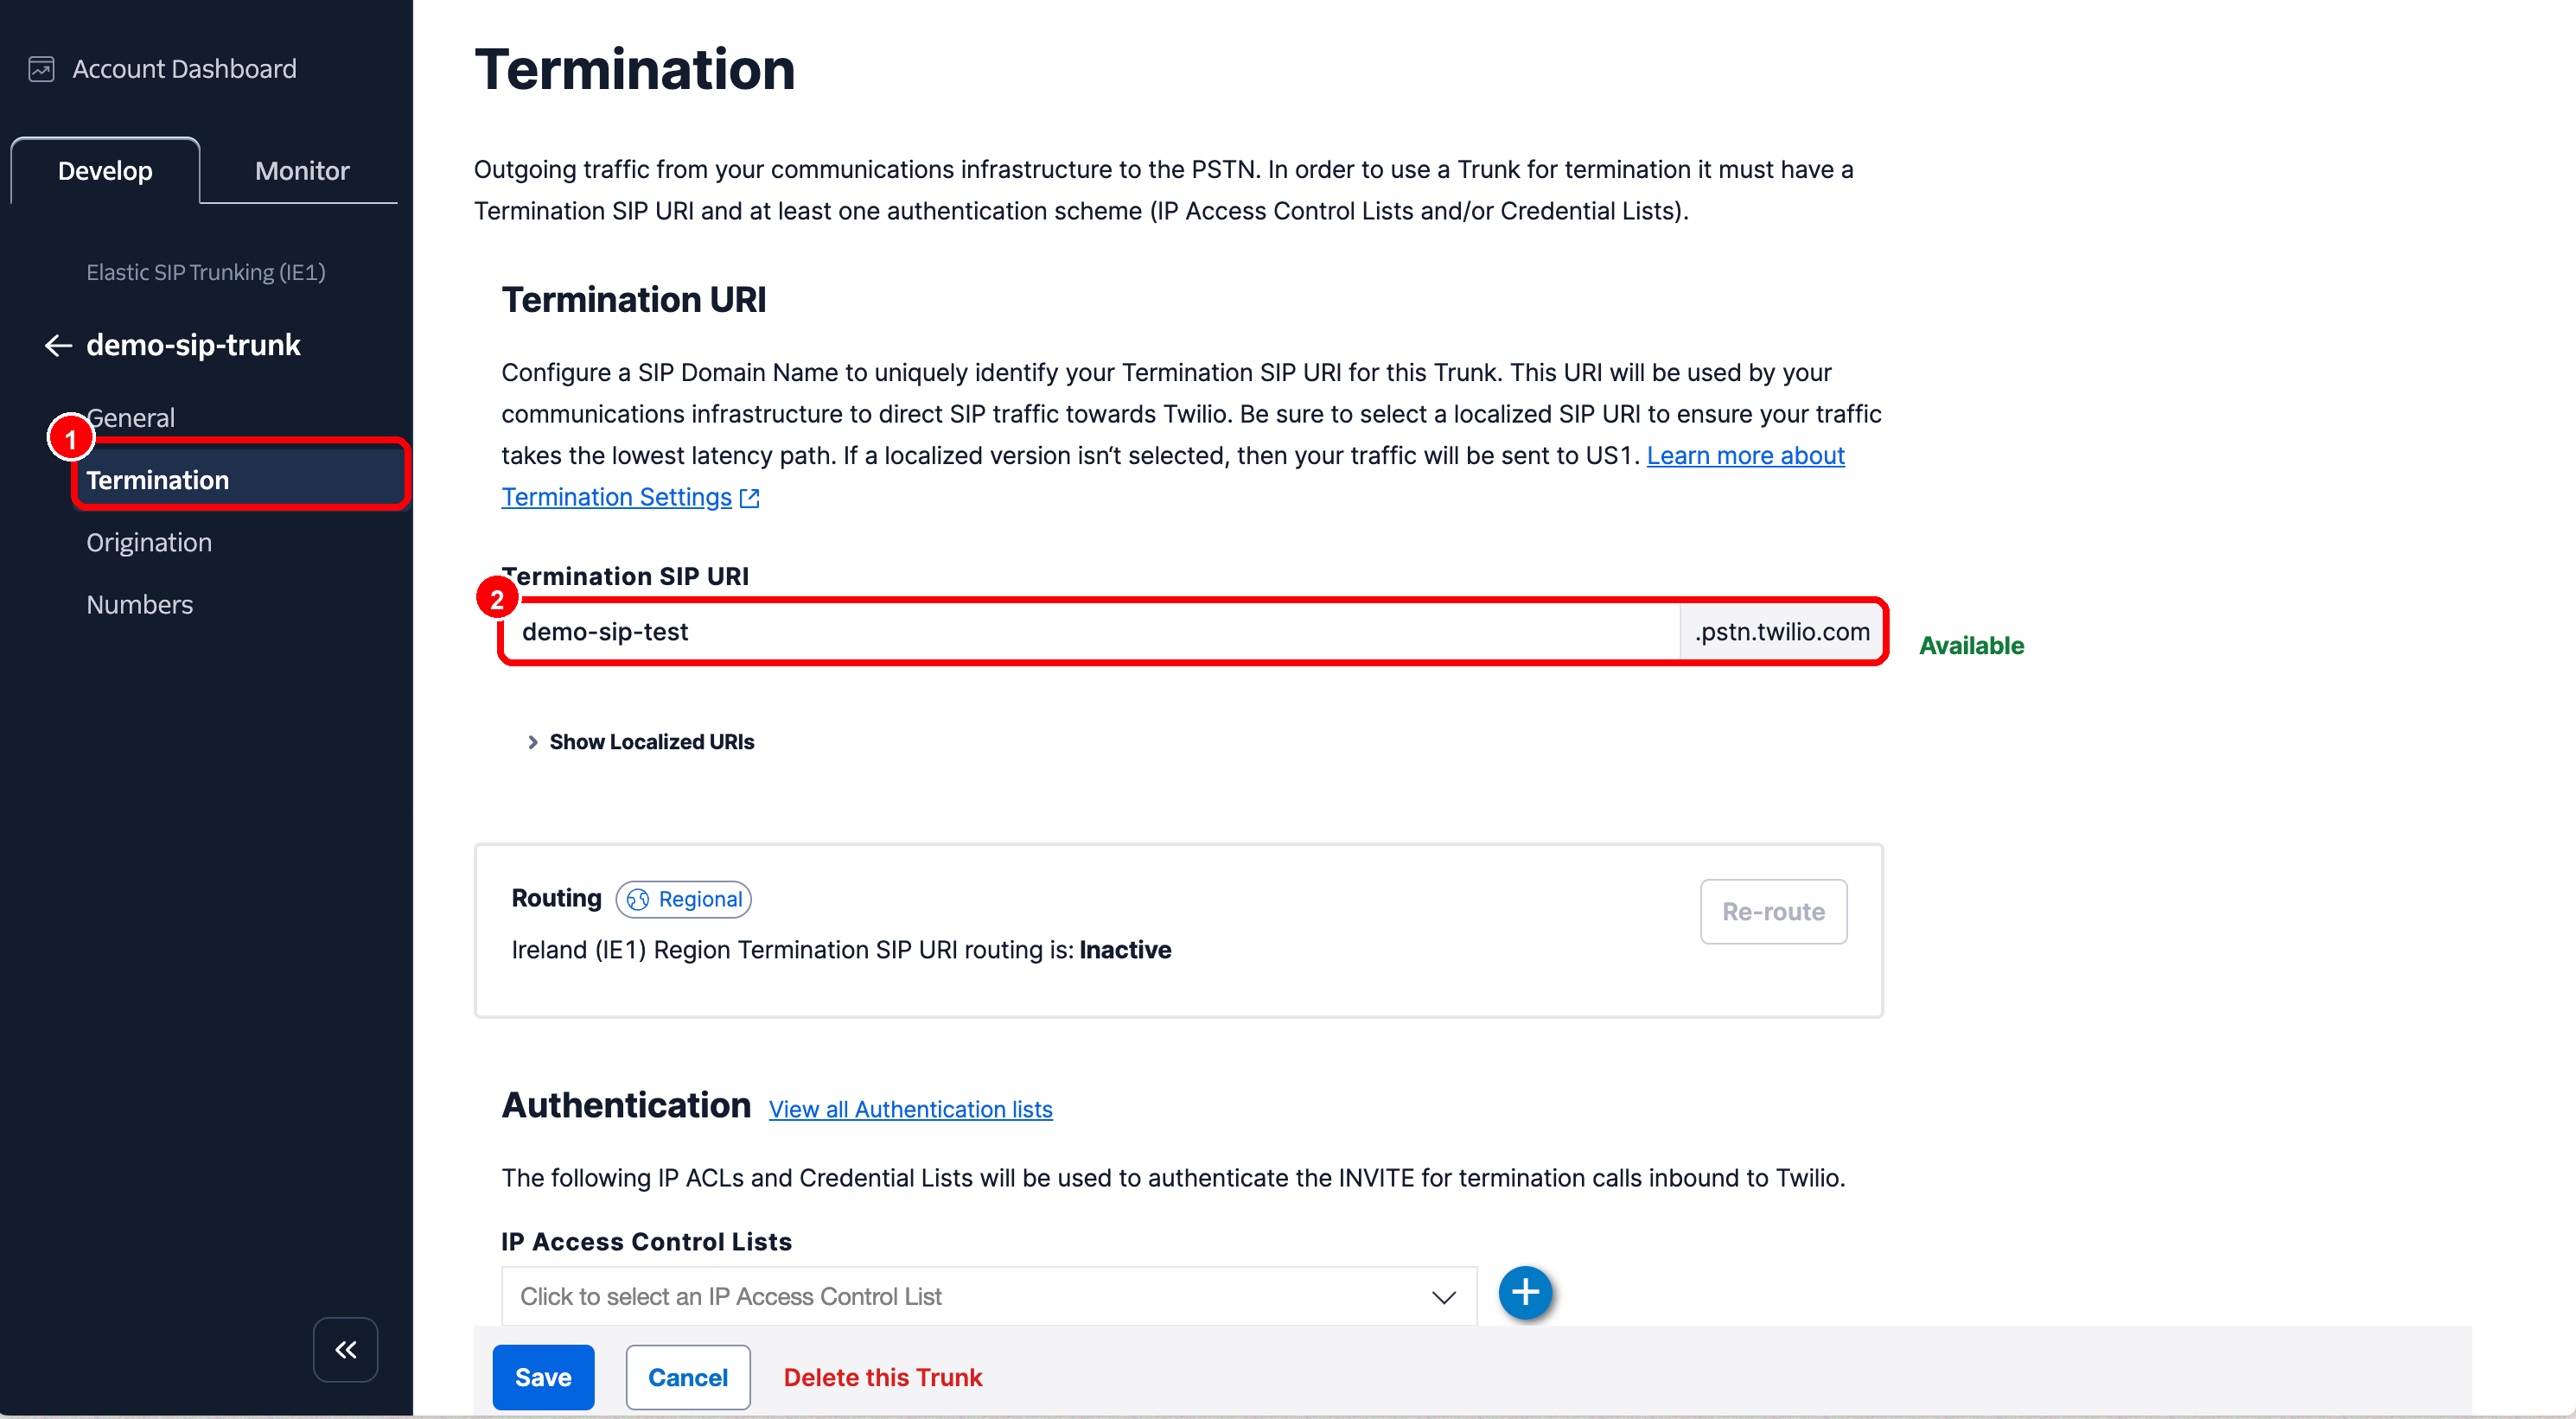
For outbound BYOS calls and warm transfers, open the **Termination** area in Twilio.
1. Set a **Termination SIP URI**, for example `my-company.pstn.twilio.com`.
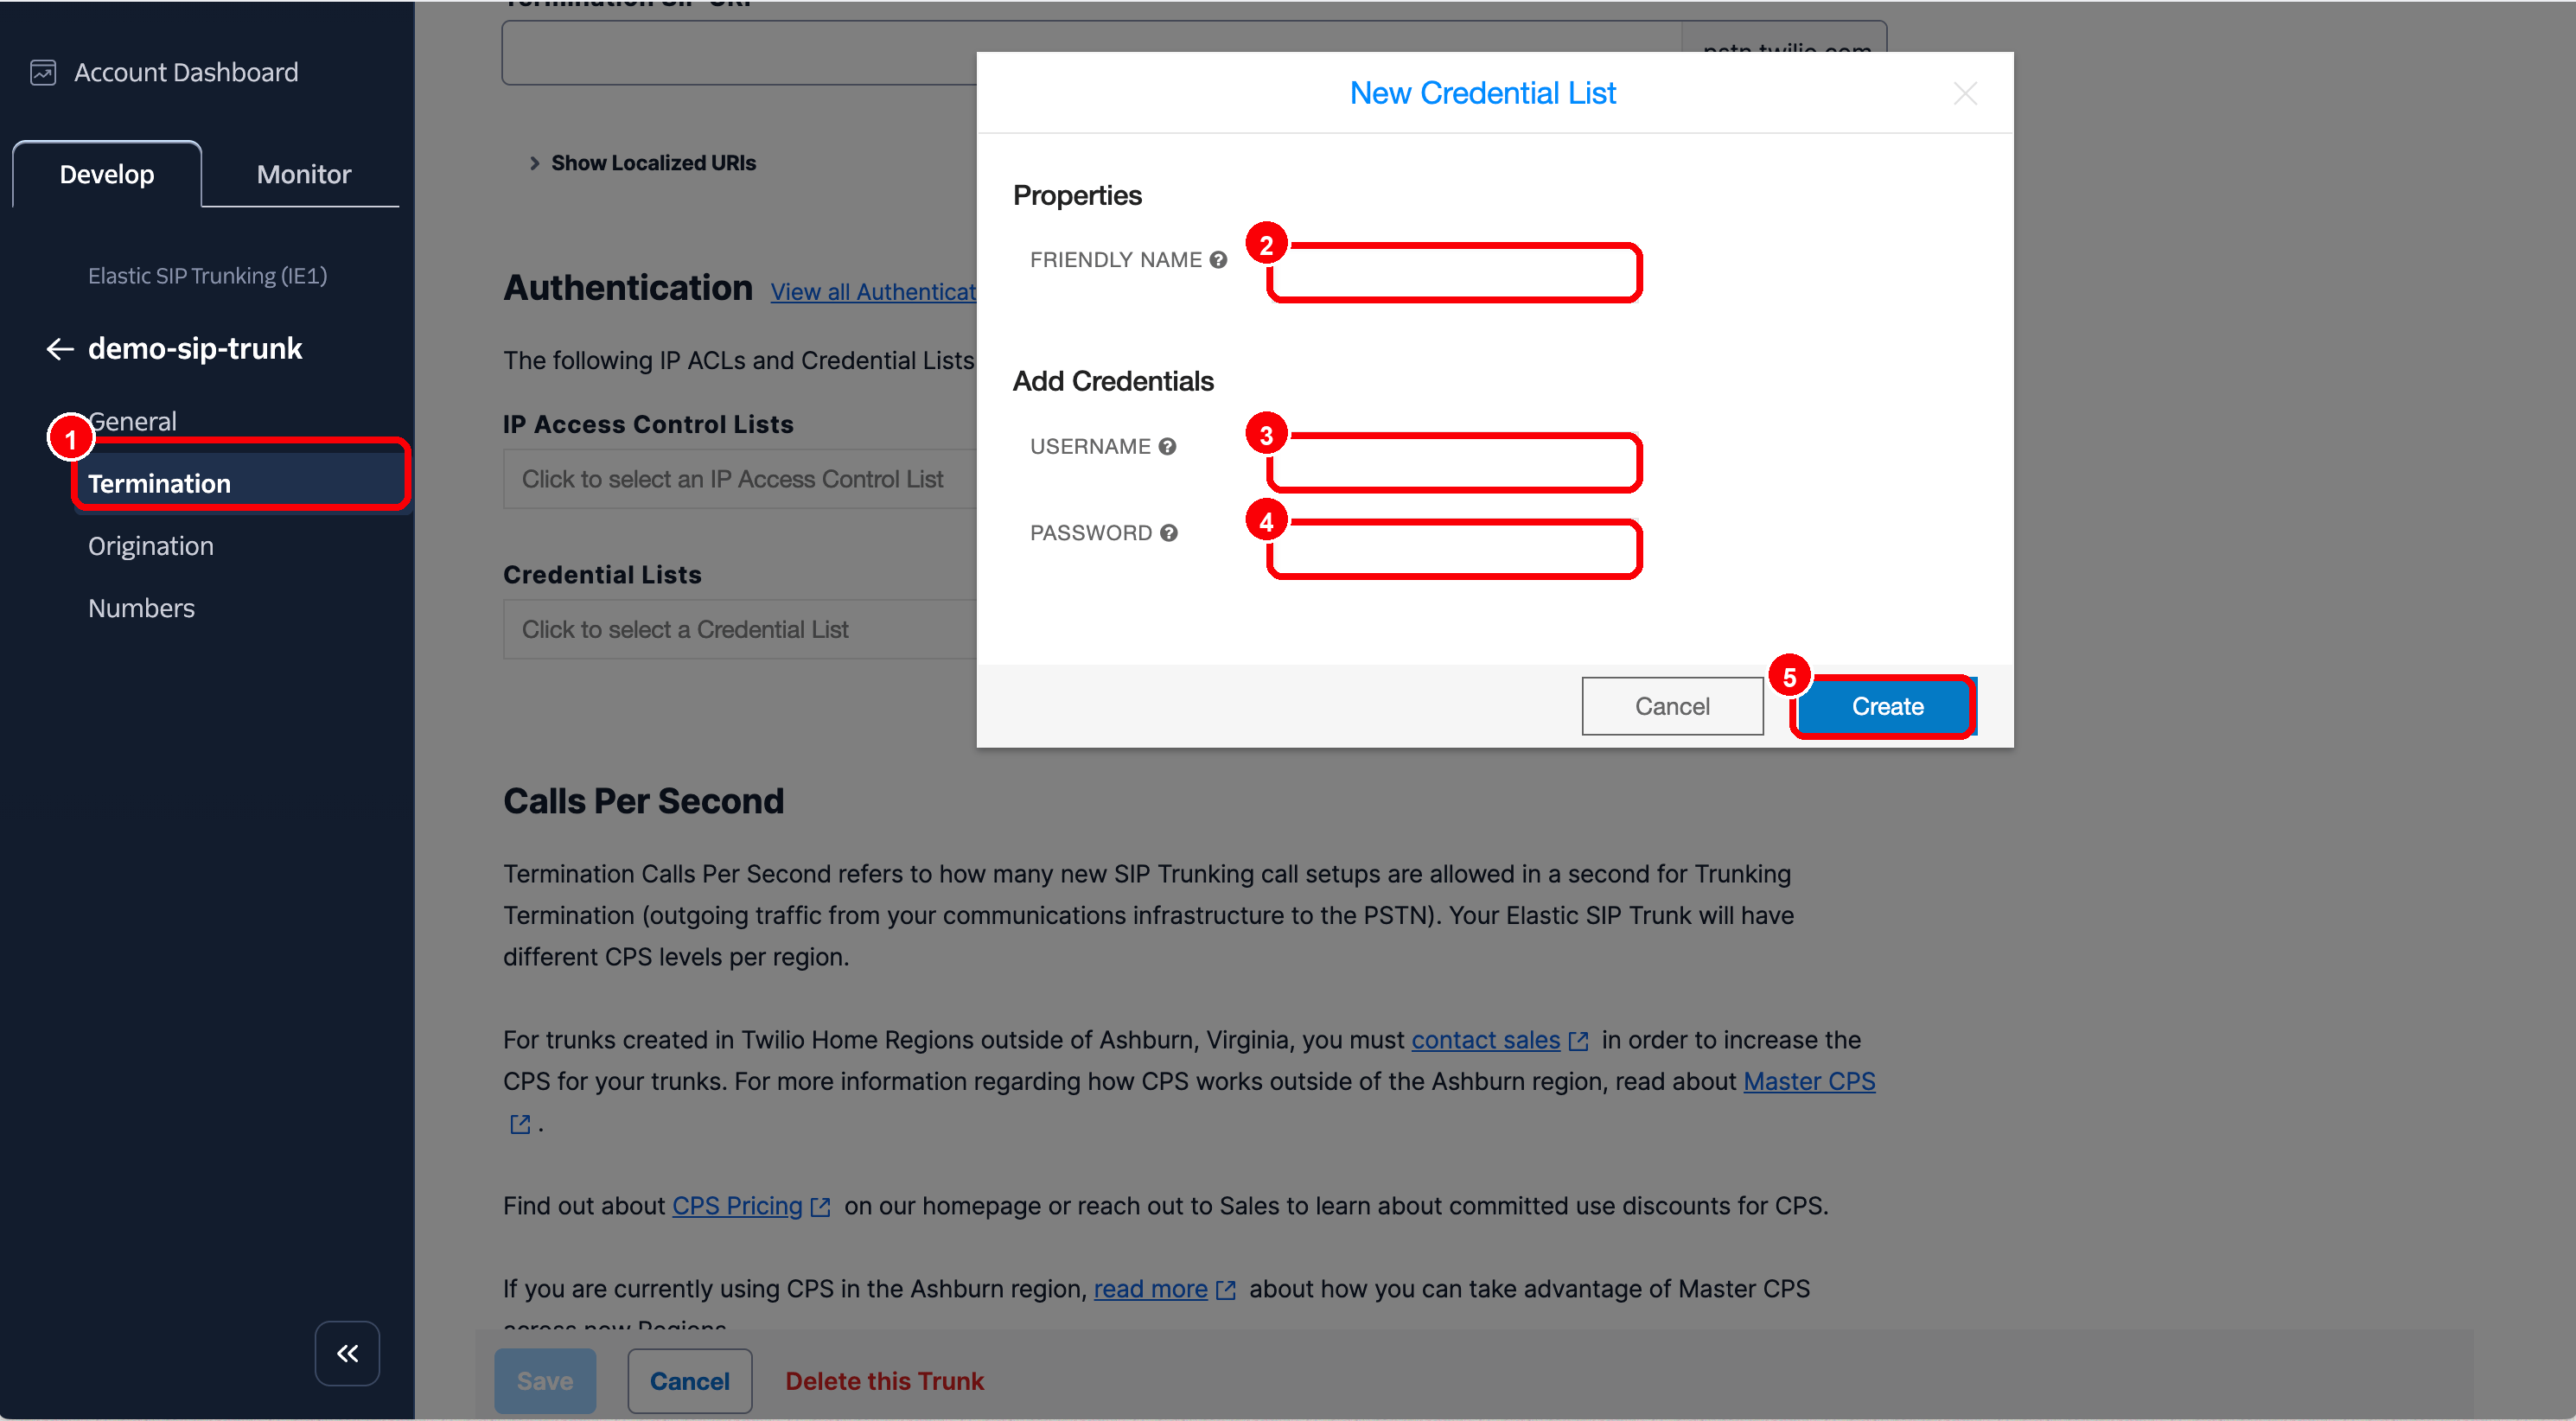
2. Create or select a **Credential List**.
3. Store a SIP username and a SIP password there.
4. Then enter these values in Placetel AI under **Set up SIP connection → Outbound**.
### 4. Set up termination and SIP credentials
For outbound BYOS calls and warm transfers, open the **Termination** area in Twilio.
1. Set a **Termination SIP URI**, for example `my-company.pstn.twilio.com`.
2. Create or select a **Credential List**.
3. Store a SIP username and a SIP password there.
4. Then enter these values in Placetel AI under **Set up SIP connection → Outbound**.
 The mapping is:
* Twilio **Termination SIP URI** → Placetel AI **Termination URL**
* Twilio **Credential List Username** → Placetel AI **Username**
* Twilio **Credential List Password** → Placetel AI **Password**
### 5. Enable SIP REFER for transfers
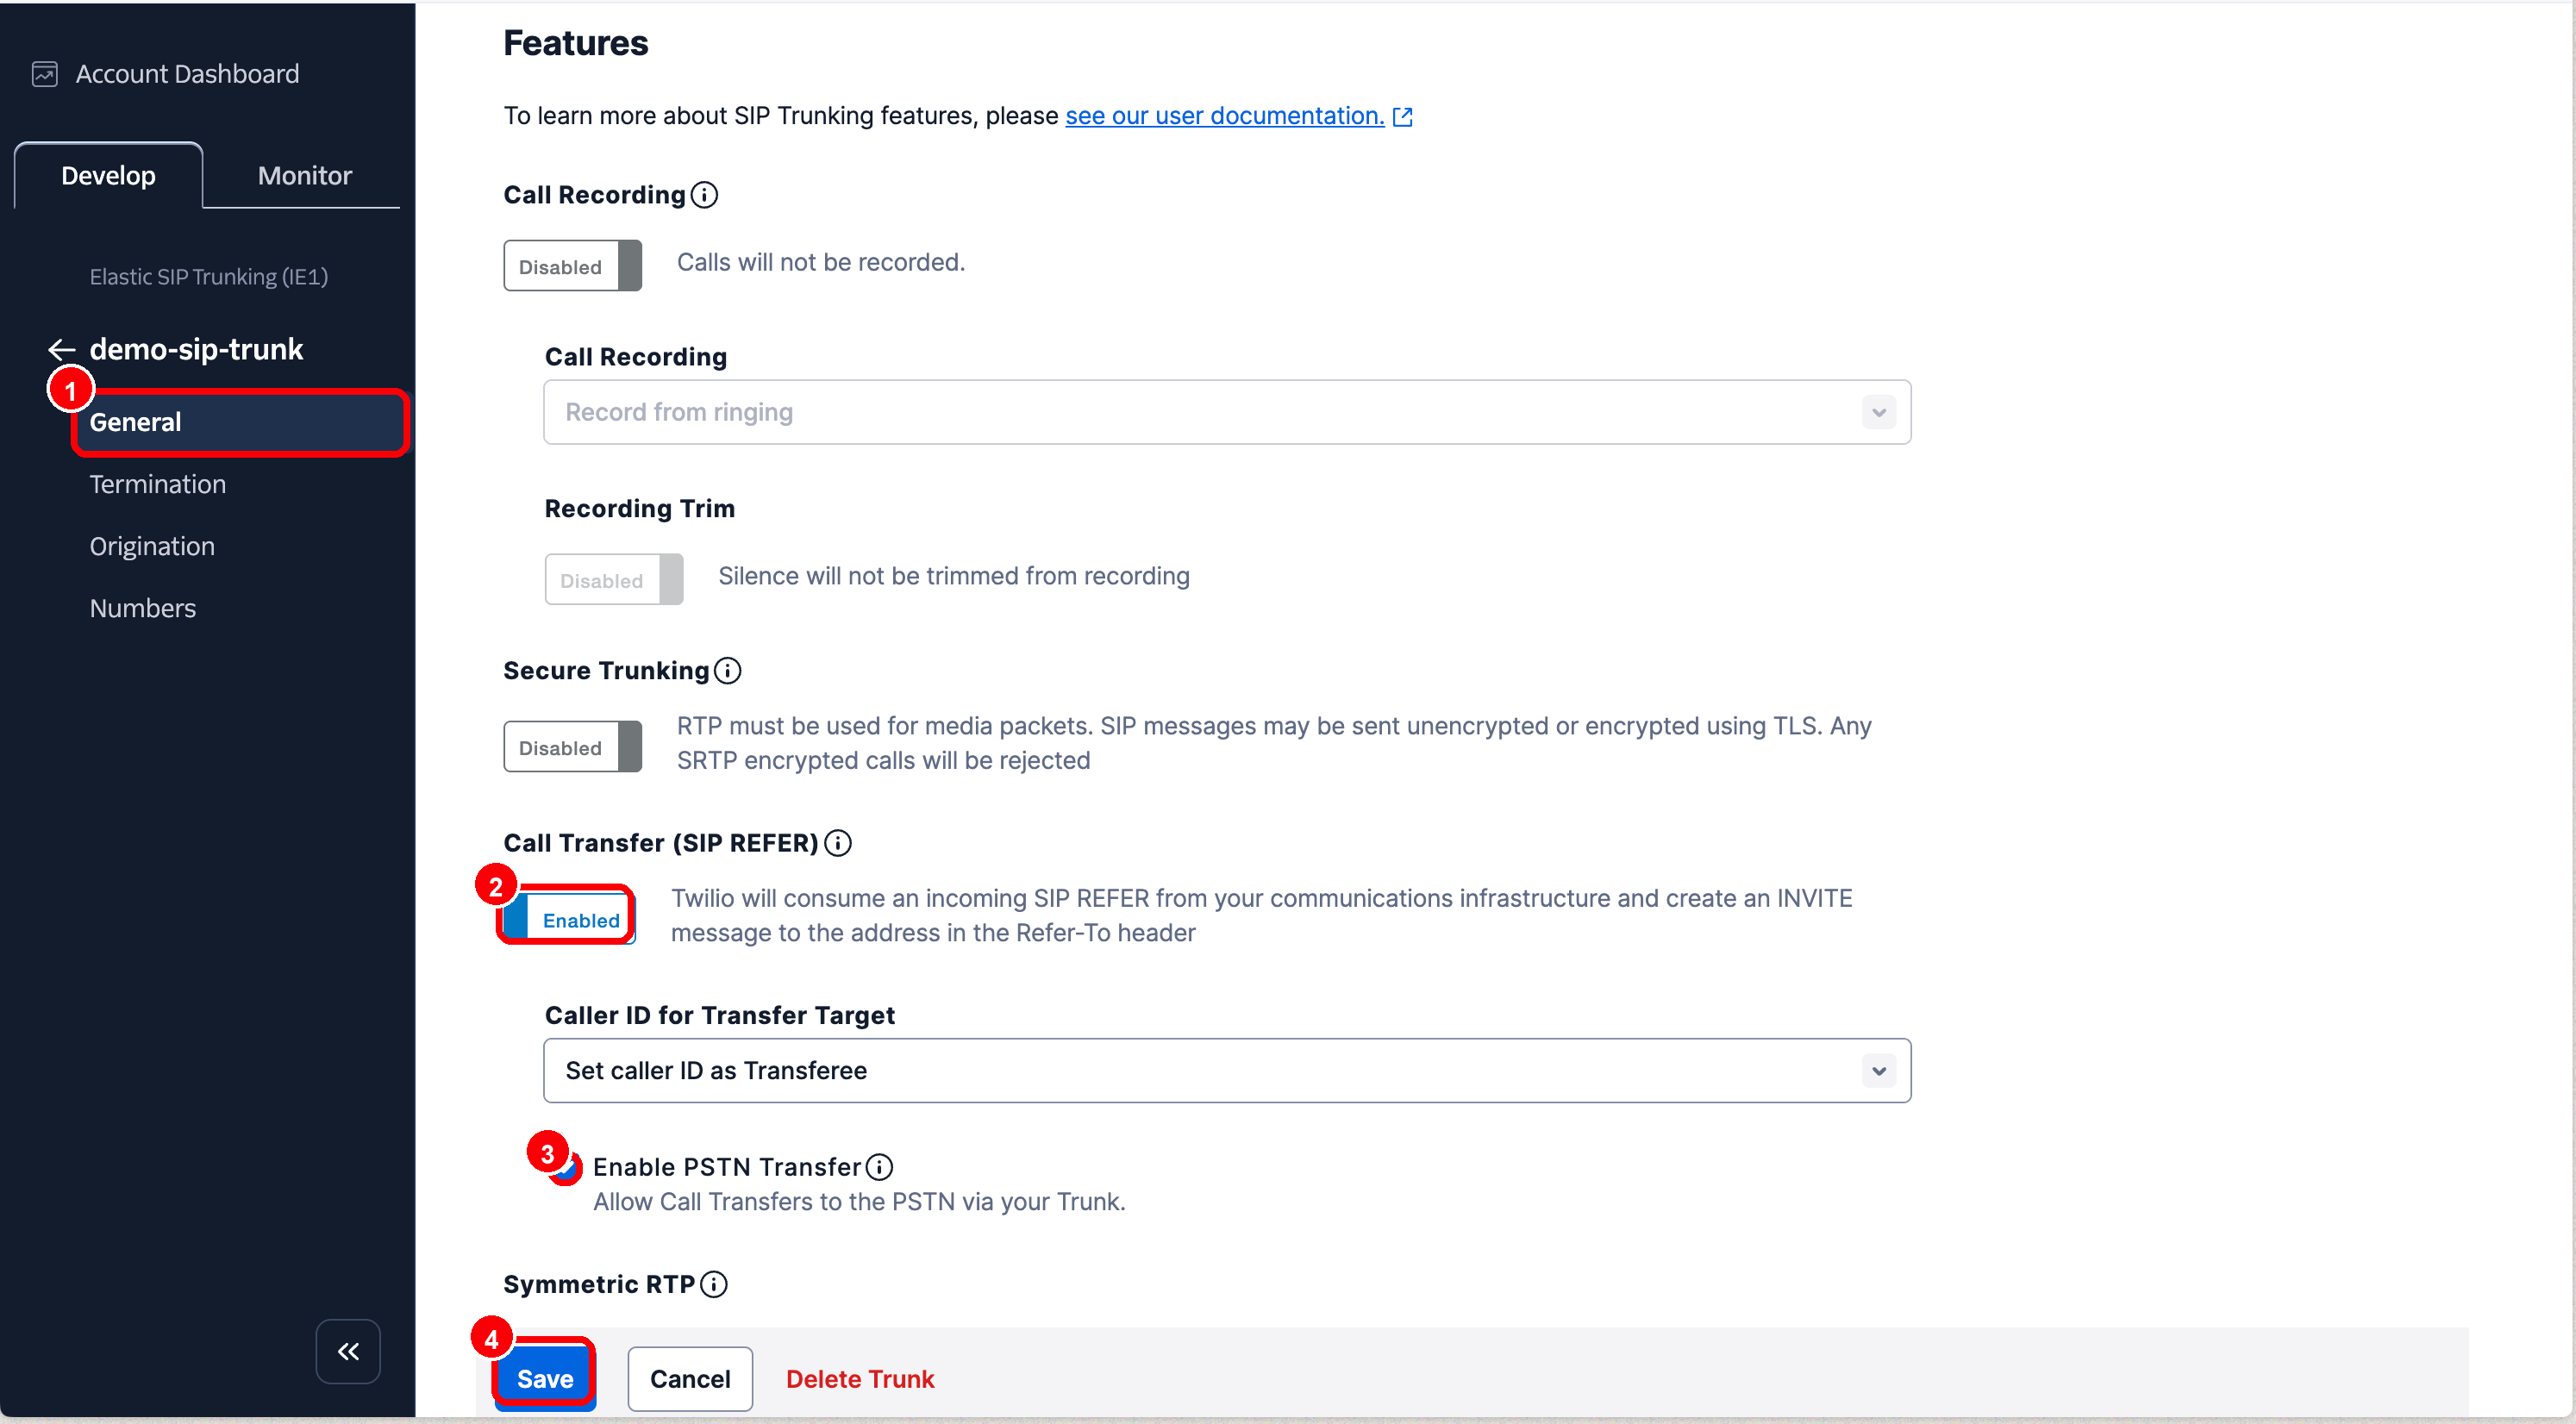
For transfers via SIP REFER, SIP REFER must be enabled in the Twilio trunk. In the trunk, open the **General** area and set the feature settings as follows:
* **Call Transfer (SIP REFER)**: enabled
* **Enable PSTN Transfer**: enabled if calls should be transferred to external PSTN numbers
* **Caller ID for Transfer Target**: to match your use case, often `Set caller ID as Transferee`
Save the changes in Twilio.
The mapping is:
* Twilio **Termination SIP URI** → Placetel AI **Termination URL**
* Twilio **Credential List Username** → Placetel AI **Username**
* Twilio **Credential List Password** → Placetel AI **Password**
### 5. Enable SIP REFER for transfers
For transfers via SIP REFER, SIP REFER must be enabled in the Twilio trunk. In the trunk, open the **General** area and set the feature settings as follows:
* **Call Transfer (SIP REFER)**: enabled
* **Enable PSTN Transfer**: enabled if calls should be transferred to external PSTN numbers
* **Caller ID for Transfer Target**: to match your use case, often `Set caller ID as Transferee`
Save the changes in Twilio.
 ### 6. Make a test call
Call the Twilio phone number connected to the trunk. The call should arrive in Placetel AI on the assigned voice agent. If the call does not arrive, check first:
* Is the Twilio phone number connected to the correct trunk?
* Is the Origination URI exactly the SIP address from Placetel AI?
* Is the inbound SIP trunk active in Placetel AI?
* Is the called phone number created under **Custom phone numbers** and assigned to a voice agent?
## Example: 3CX
3CX is a supported BYOS setup. The following steps show how to route calls from a **3CX** phone system to Placetel AI. Inbound calls travel from your provider through 3CX to Placetel AI, where a voice agent answers.
```text theme={null}
Caller → your provider → 3CX → Placetel AI → Voice Agent
```
These steps use an example phone number `+499999999999`, an internal 3CX prefix `999`, and the resulting dial string `999+499999999999`. Replace them with your own values. You need administrator access to the 3CX Admin Console, plus the inbound SIP trunk and a custom phone number already set up in Placetel AI (see above).
### 1. Create a SIP trunk
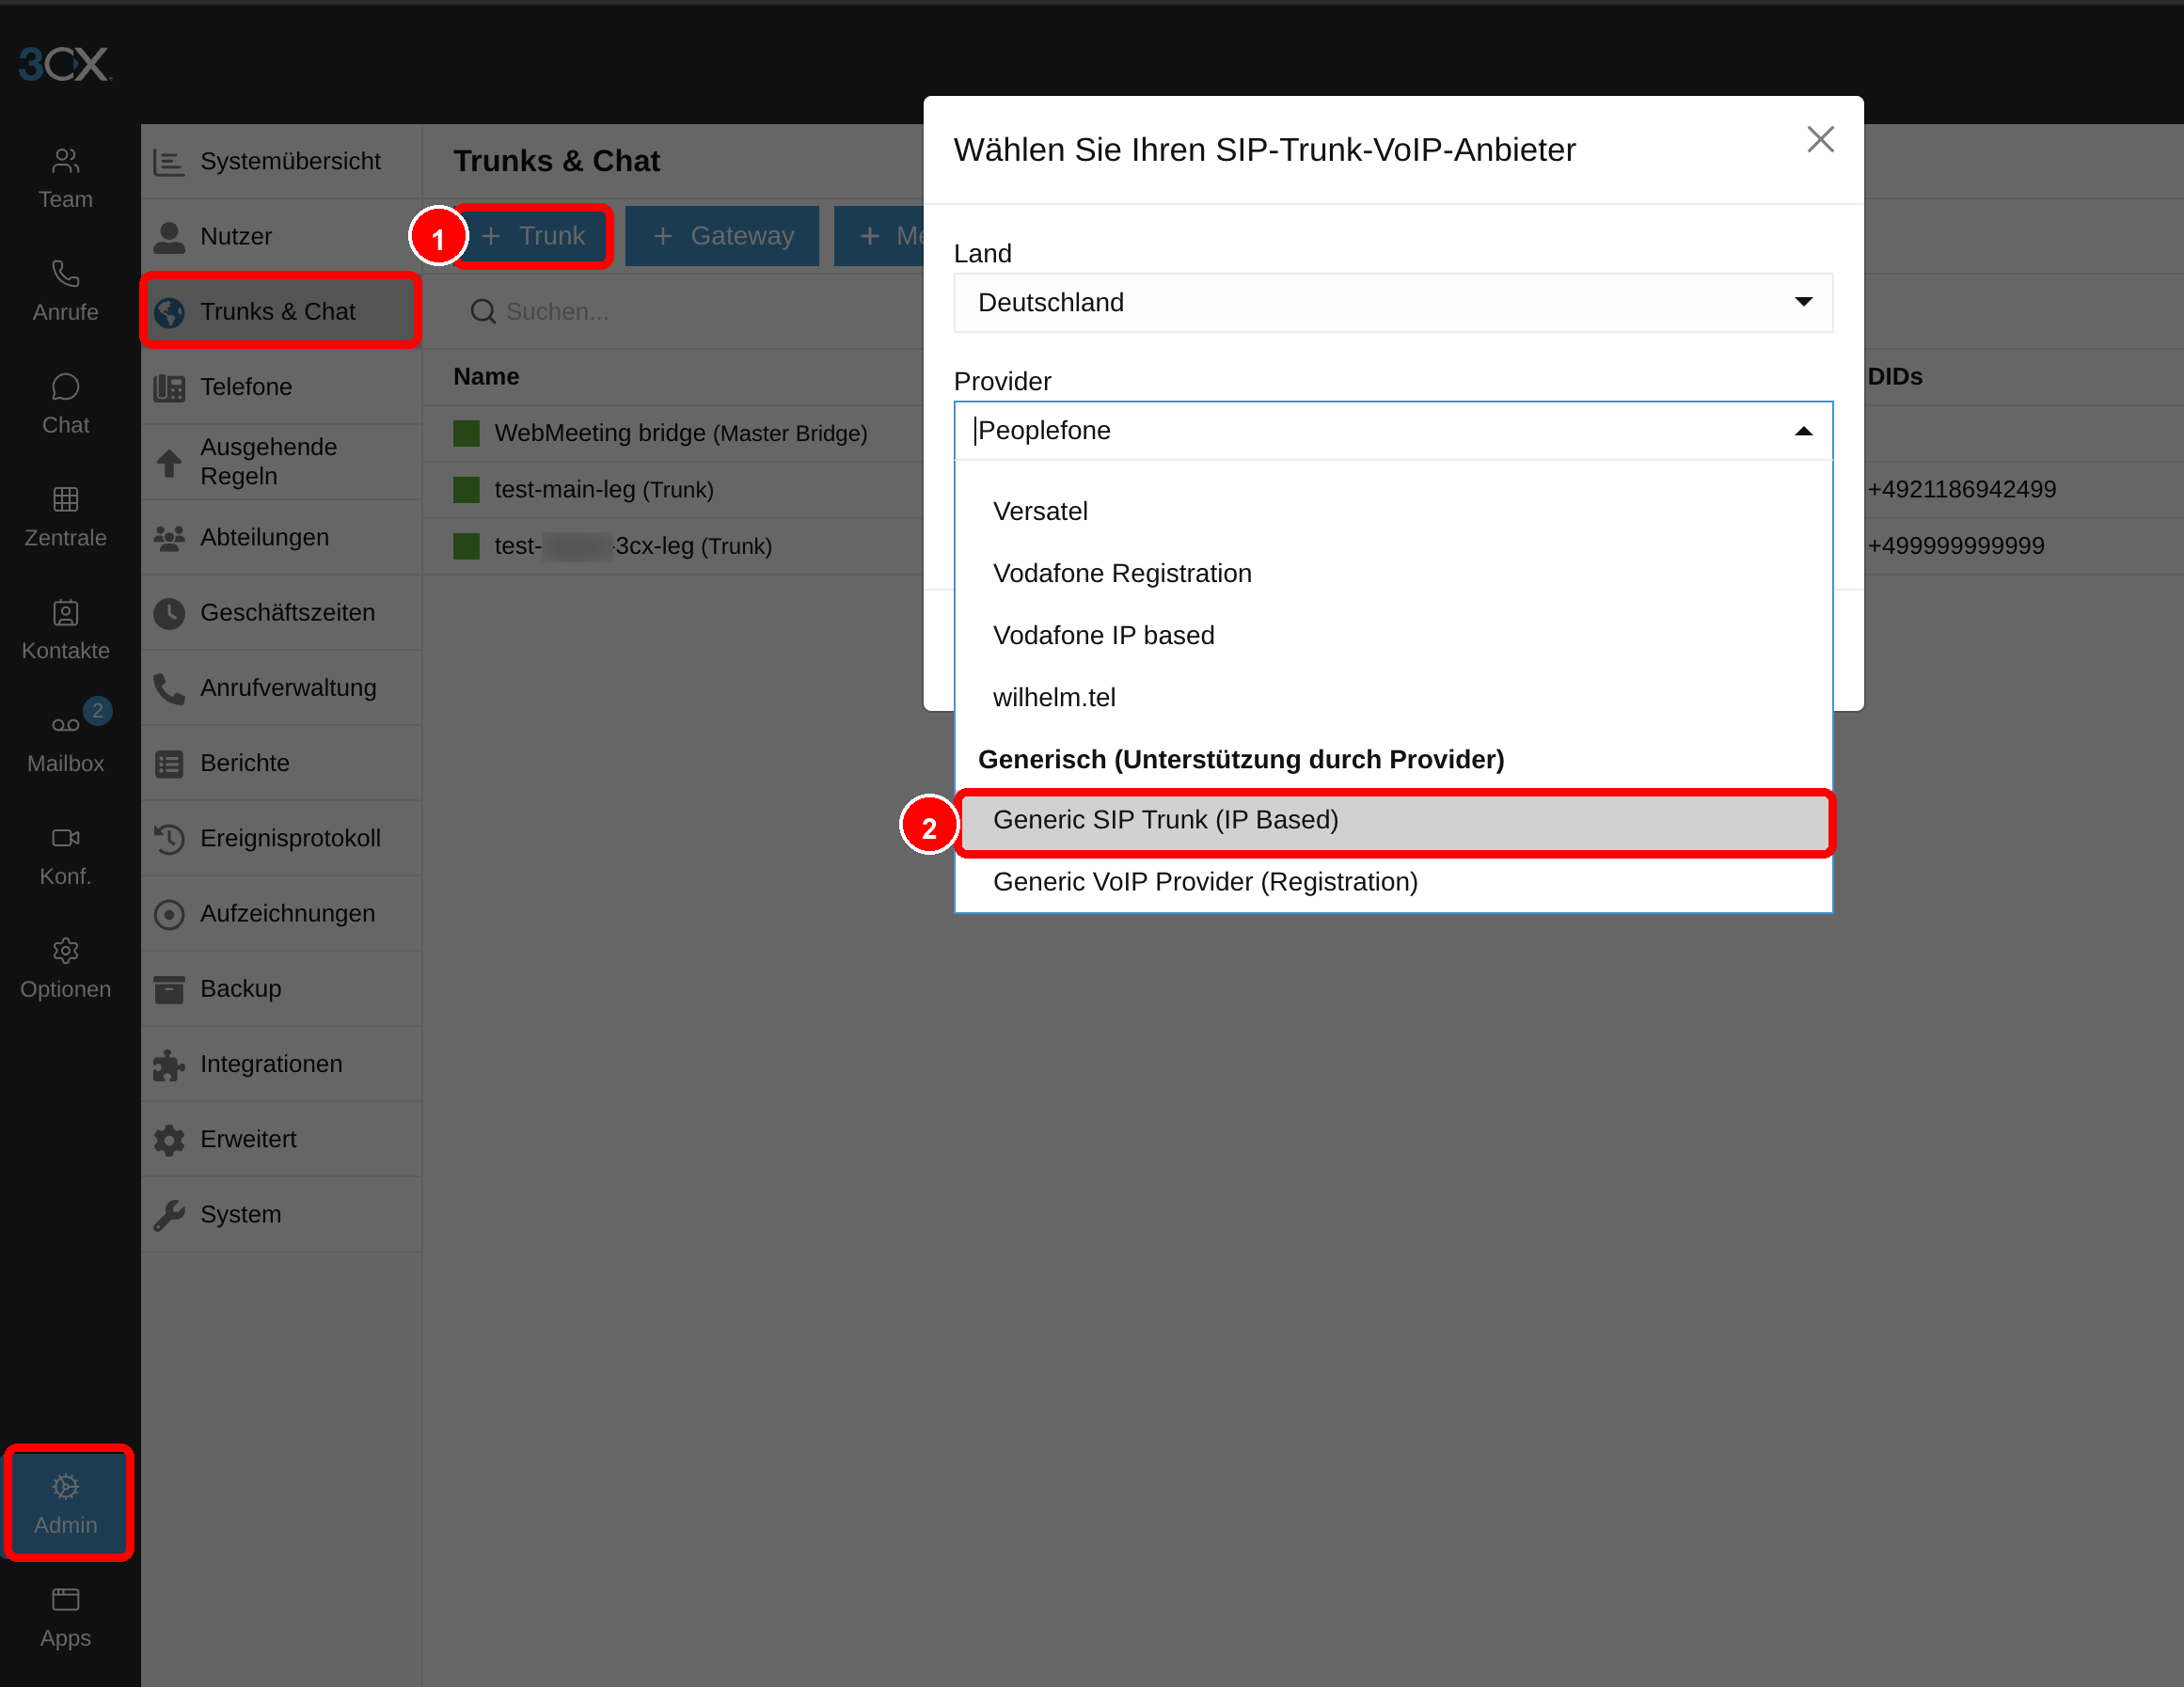
In the 3CX Admin console, open **Trunks & Chat**, click **+ Trunk**, and choose **Generic SIP Trunk (IP Based)**.
### 6. Make a test call
Call the Twilio phone number connected to the trunk. The call should arrive in Placetel AI on the assigned voice agent. If the call does not arrive, check first:
* Is the Twilio phone number connected to the correct trunk?
* Is the Origination URI exactly the SIP address from Placetel AI?
* Is the inbound SIP trunk active in Placetel AI?
* Is the called phone number created under **Custom phone numbers** and assigned to a voice agent?
## Example: 3CX
3CX is a supported BYOS setup. The following steps show how to route calls from a **3CX** phone system to Placetel AI. Inbound calls travel from your provider through 3CX to Placetel AI, where a voice agent answers.
```text theme={null}
Caller → your provider → 3CX → Placetel AI → Voice Agent
```
These steps use an example phone number `+499999999999`, an internal 3CX prefix `999`, and the resulting dial string `999+499999999999`. Replace them with your own values. You need administrator access to the 3CX Admin Console, plus the inbound SIP trunk and a custom phone number already set up in Placetel AI (see above).
### 1. Create a SIP trunk
In the 3CX Admin console, open **Trunks & Chat**, click **+ Trunk**, and choose **Generic SIP Trunk (IP Based)**.
 ### 2. Enter the trunk data
* **Main trunk number**: your phone number from Placetel AI, for example `+499999999999`.
* **Authentication type**: **None – IP based**.
* **Registrar/Server**: the Placetel AI SIP address from above, **without** the `sip:` prefix:
```text theme={null}
in-abc1234567890abcdef1234.aisip.placetel.de
```
Do not include the `sip:` prefix in the Registrar/Server field. Otherwise Placetel AI responds with `400 Bad Request`.
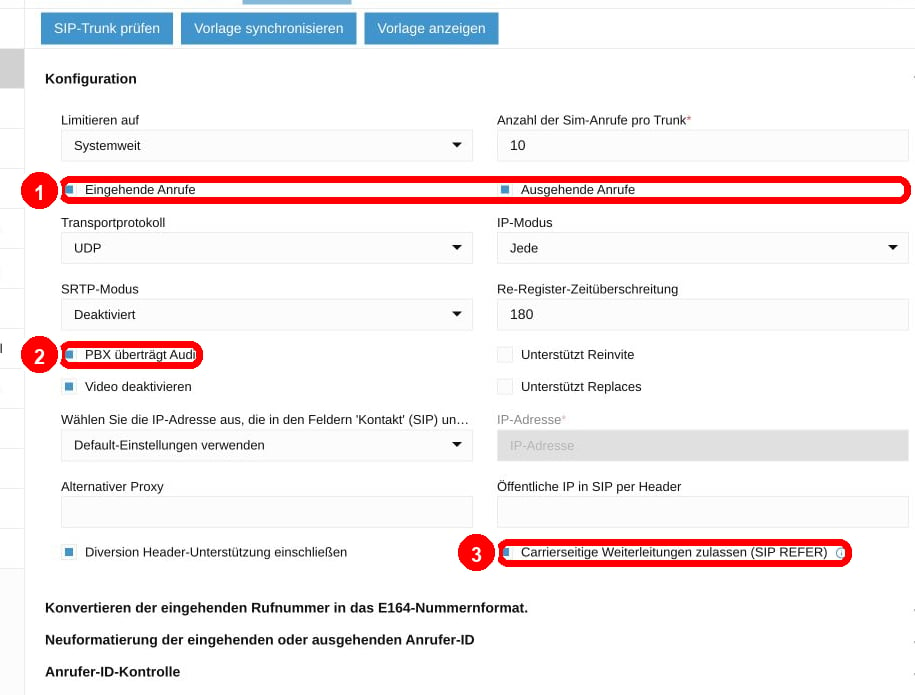
### 3. Allow calls back to 3CX
In the trunk configuration:
* Enable **Inbound calls** and **Outbound calls**.
* Enable **PBX delivers audio**.
* Enable **Allow carrier-side forwarding (SIP REFER)** if you use transfers.
### 2. Enter the trunk data
* **Main trunk number**: your phone number from Placetel AI, for example `+499999999999`.
* **Authentication type**: **None – IP based**.
* **Registrar/Server**: the Placetel AI SIP address from above, **without** the `sip:` prefix:
```text theme={null}
in-abc1234567890abcdef1234.aisip.placetel.de
```
Do not include the `sip:` prefix in the Registrar/Server field. Otherwise Placetel AI responds with `400 Bad Request`.
### 3. Allow calls back to 3CX
In the trunk configuration:
* Enable **Inbound calls** and **Outbound calls**.
* Enable **PBX delivers audio**.
* Enable **Allow carrier-side forwarding (SIP REFER)** if you use transfers.
 ### 4. Create an outbound rule
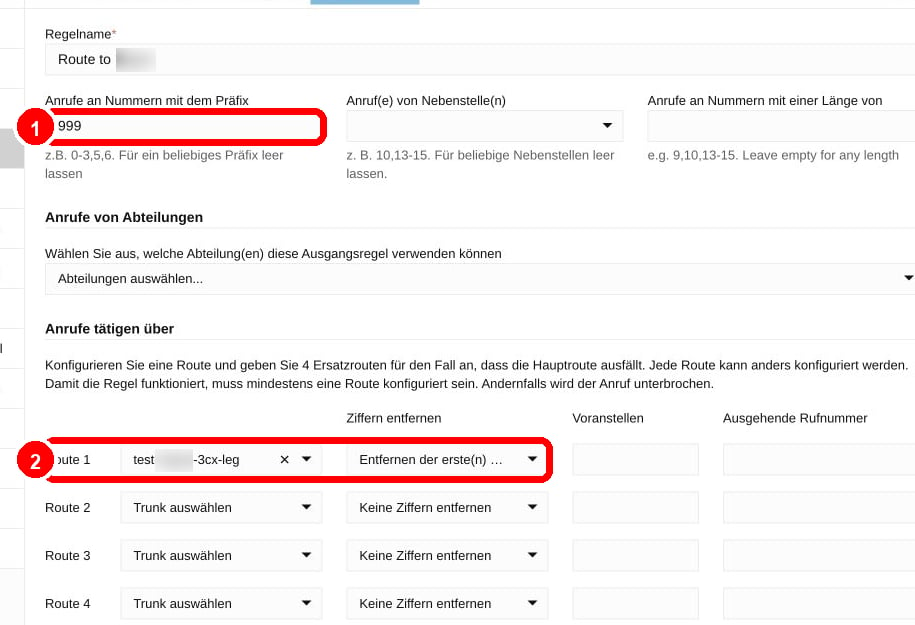
Create an outbound rule that sends the internal prefix to the Placetel AI trunk:
1. Set the prefix to `999`.
2. Set **Route 1** to the Placetel AI trunk.
3. Under **Strip digits**, remove the first 3 digits.
### 4. Create an outbound rule
Create an outbound rule that sends the internal prefix to the Placetel AI trunk:
1. Set the prefix to `999`.
2. Set **Route 1** to the Placetel AI trunk.
3. Under **Strip digits**, remove the first 3 digits.
 ### 5. Forward the inbound number to Placetel AI
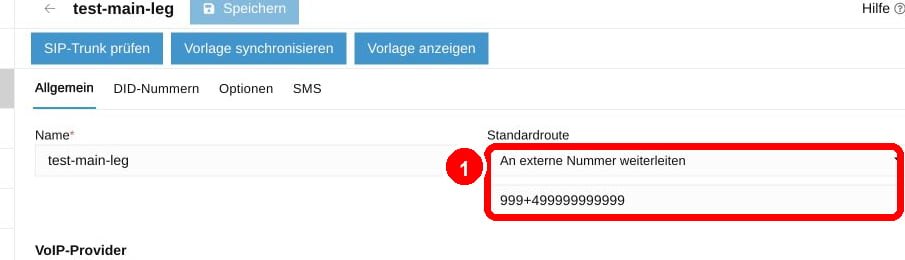
Open the existing 3CX trunk that receives your real phone number.
1. Set the **default route** to **Forward to external number**.
2. Set the external number to `999+499999999999` — the internal prefix followed by your number.
### 5. Forward the inbound number to Placetel AI
Open the existing 3CX trunk that receives your real phone number.
1. Set the **default route** to **Forward to external number**.
2. Set the external number to `999+499999999999` — the internal prefix followed by your number.
 ### 6. Make a test call
Call the phone number that arrives via 3CX. The call should reach Placetel AI on the assigned voice agent. If it does not, check first:
* Does the outbound rule use prefix `999`, strip `3` digits, and Route 1 to the Placetel AI trunk?
* Does the **Registrar/Server** field contain the SIP address **without** the `sip:` prefix? A `sip:` prefix causes `400 Bad Request`.
* Is the default route of the existing 3CX trunk set to forward to `999+499999999999`? Otherwise the call may land in the 3CX mailbox.
* If 3CX reports *"Call forbidden by administrator"*, allow the country code under **Admin → Advanced → Allowed Country Codes**.
* If **Allowed Source IPs / CIDRs** is set in Placetel AI, allow the public IP address of your 3CX system.
* For transfers to colleagues, use a 3CX extension or ring group as the target first.
### 6. Make a test call
Call the phone number that arrives via 3CX. The call should reach Placetel AI on the assigned voice agent. If it does not, check first:
* Does the outbound rule use prefix `999`, strip `3` digits, and Route 1 to the Placetel AI trunk?
* Does the **Registrar/Server** field contain the SIP address **without** the `sip:` prefix? A `sip:` prefix causes `400 Bad Request`.
* Is the default route of the existing 3CX trunk set to forward to `999+499999999999`? Otherwise the call may land in the 3CX mailbox.
* If 3CX reports *"Call forbidden by administrator"*, allow the country code under **Admin → Advanced → Allowed Country Codes**.
* If **Allowed Source IPs / CIDRs** is set in Placetel AI, allow the public IP address of your 3CX system.
* For transfers to colleagues, use a 3CX extension or ring group as the target first.