

What is post-processing?
Post-processing runs automatically after every call. As soon as a conversation ends, you can:- Send an email with a summary of the conversation
- Send an SMS as a notification or confirmation
- Send an API request to external systems
- Automatically create a ticket from the conversation
Where do I see the results after a call?
You find the results of each post-processing run in the Call History:- Open the Call History section in the main navigation.
- Click a conversation to open the detail view.
- Switch to the Post-Processing tab.
- There you see the status of each configured task as well as the content that was actually sent.
Status overview:
- Sent — The message was delivered successfully.
- Skipped — The condition was not met; the task was deliberately not executed.
- Failed — An error occurred during delivery (e.g. invalid email address).
- Processing — The AI processing is still running.
Managing post-processing tasks
All post-processing tasks are managed per voice agent. Open the voice agent you want and switch to the Post-Processing tab. There you see a list of all tasks configured for this agent. For each task you can:- Enable / Disable — The toggle in the list activates or pauses a task immediately.
- Edit — Open the task and change its settings.
- Duplicate — Create a copy of the task (e.g. for another phone number with a similar configuration).
- Delete — Remove the task permanently.
Configuring an email
When creating or editing an email task, you configure three areas: Recipient, Content, and optionally a Condition.Recipient
Who should receive the email? You have two options: Fixed email address The email always goes to one or more fixed addresses — regardless of who called. Simply enter one or more email addresses (confirm multiple addresses with Enter). Ideal for team notifications or internal forwarding. Dynamic — AI-based The AI decides who the email is sent to based on the conversation. You enter an instruction, e.g. “Send to the email address the caller mentioned during the conversation.” This mode is suitable when the recipient depends on the conversation content.Content
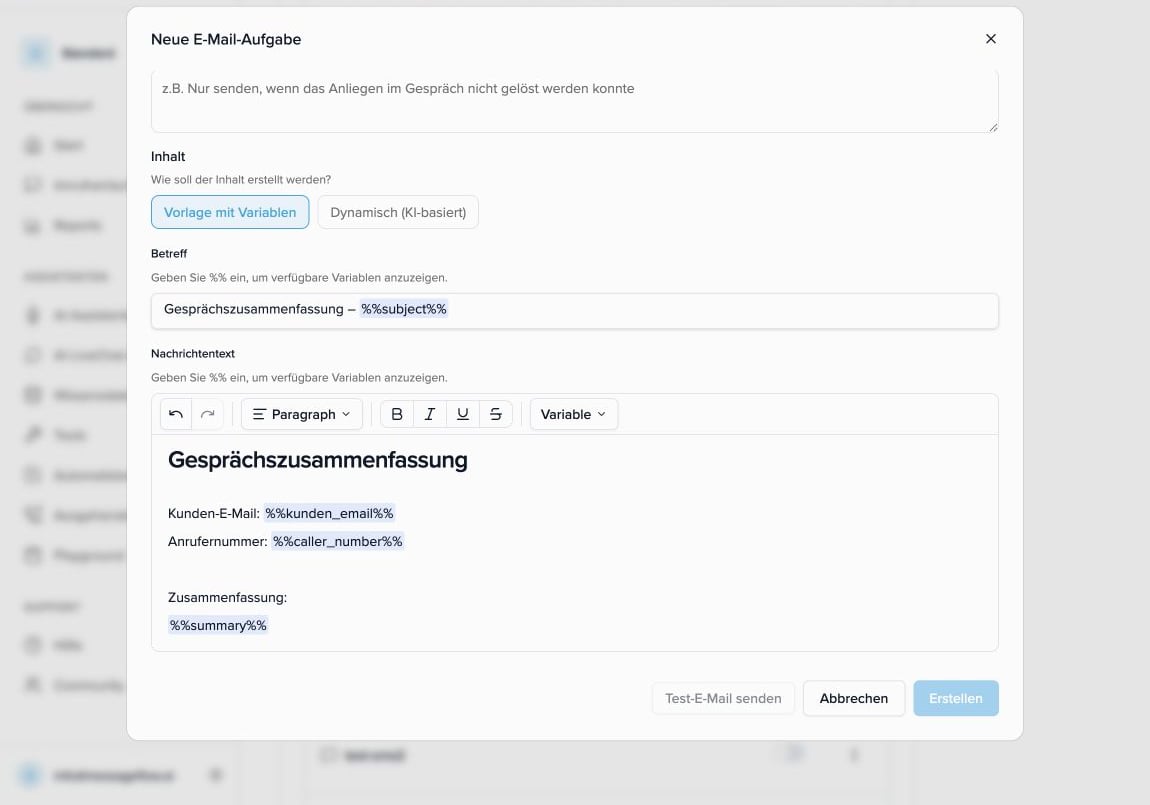
How should the email be structured? You have two approaches: Template with variables You write the email text yourself — with a subject and message body. Use variables (e.g.%%caller_number%% or %%summary%%) to insert conversation data automatically. The text is filled with the real values after every call. HTML formatting is supported.
Tip: Click the “Variable” button in the editor to see and insert all available variables.
Dynamic — AI-based (AI writes the email)
You give the AI an instruction describing what the email should look like. The AI reads the full conversation log and composes the subject and body on its own. Ideal if you don’t want a fixed template, but a natural email tailored to the conversation.
Example instruction: “Create a professional email summary of the conversation. State the caller’s main concern and the outcome of the conversation. Maximum 200 words.”
Condition (optional)
Don’t want to send the email after every call? Then define a condition. After the conversation, the AI evaluates whether the condition is met — and only then sends the email. Examples:- “Only send if the caller’s issue was not resolved.”
- “Only send if the caller requested a callback.”
- “Only send if the caller placed an order.”
Configuring an SMS
The SMS configuration follows the same logic as the email, but without a subject and with a few SMS-specific details.Recipient
Caller’s number The SMS goes directly to the person who called. Handy for automatic confirmations or summaries sent to the caller themselves. Fixed number The SMS always goes to a fixed phone number (in international format, e.g.+4921112345678). Ideal for internal notifications.
Dynamic — AI-based
The AI determines the recipient number from the conversation content. You formulate an instruction, and the AI extracts or decides the target number.
Content
Write the SMS text directly in the text field. Here too you can use variables to insert conversation data.Sender name (optional)
You can set a sender name that is shown to the recipient instead of a phone number (e.g. “YourService”). Rules:- Maximum 11 characters
- Only letters (a-z, A-Z), digits (0-9), and spaces
- Must contain at least one letter
Condition (optional)
Works exactly like for the email: after the conversation, the AI decides whether the SMS is sent. Leave the field empty to send an SMS after every call.Defining custom extractions
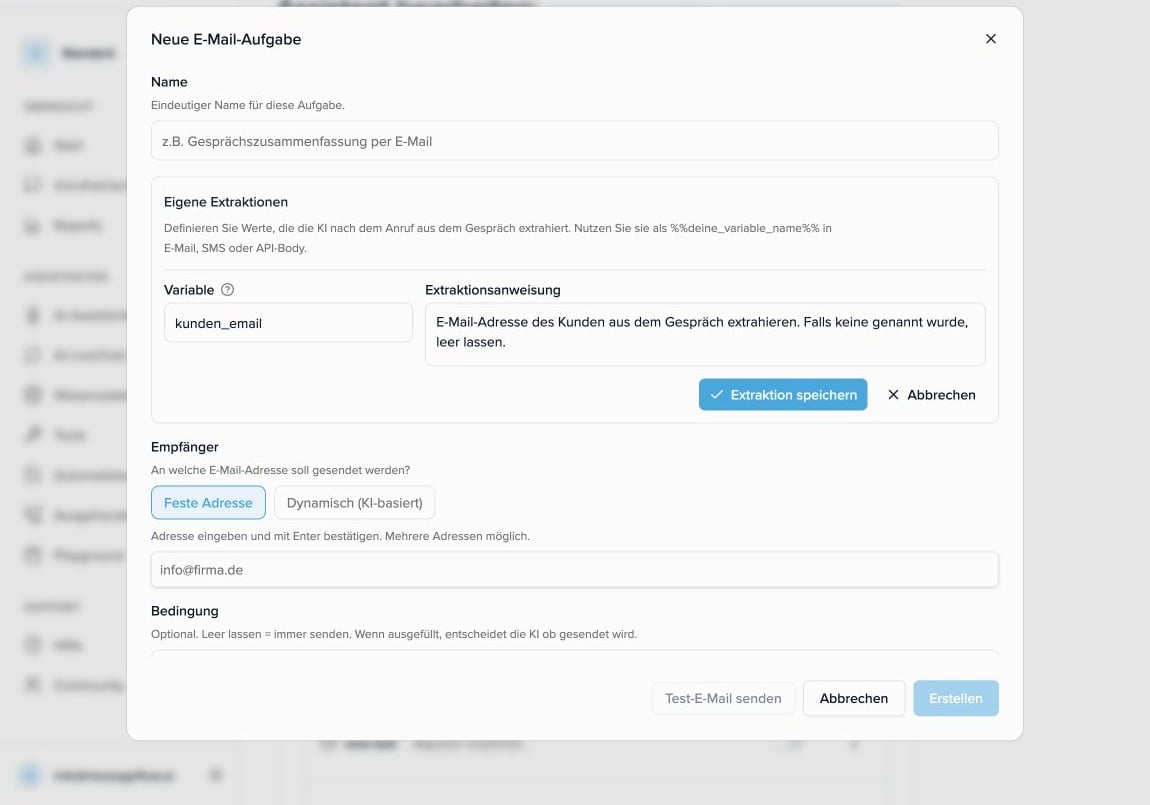
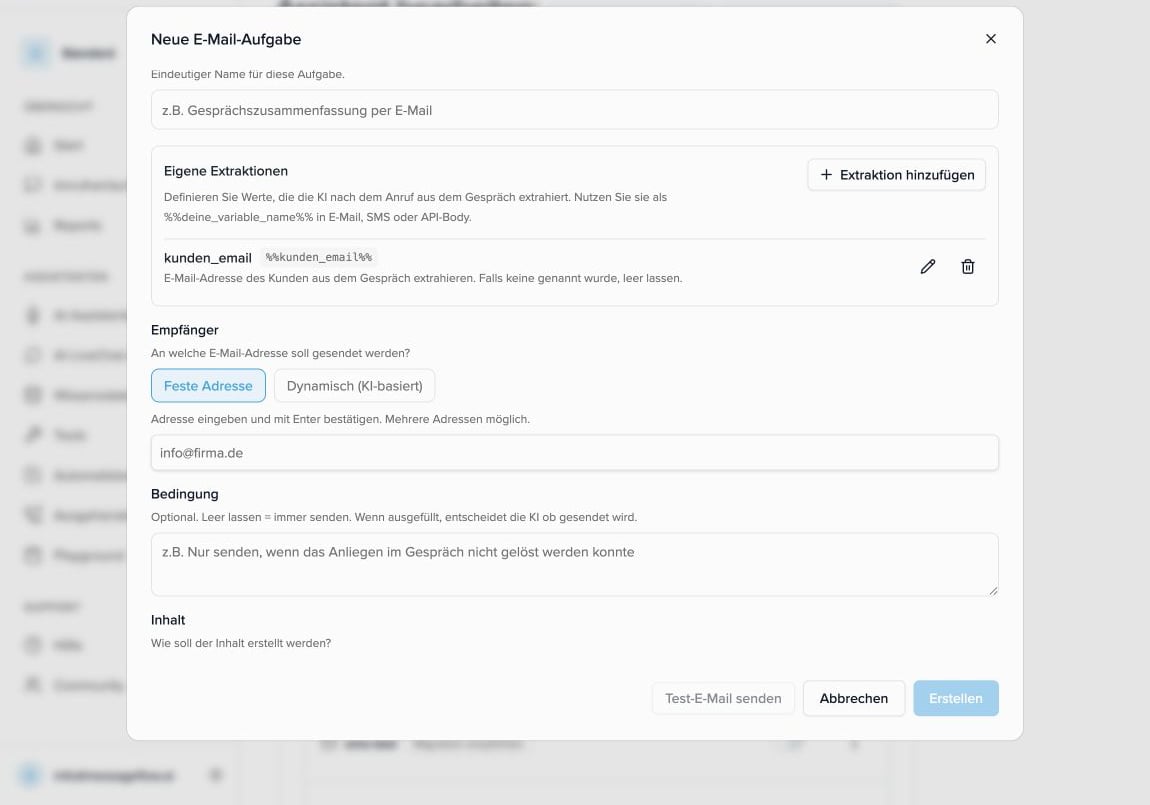
The standard variables aren’t enough? Then you can define custom extractions in email, SMS, and API tasks. A custom extraction consists of two parts: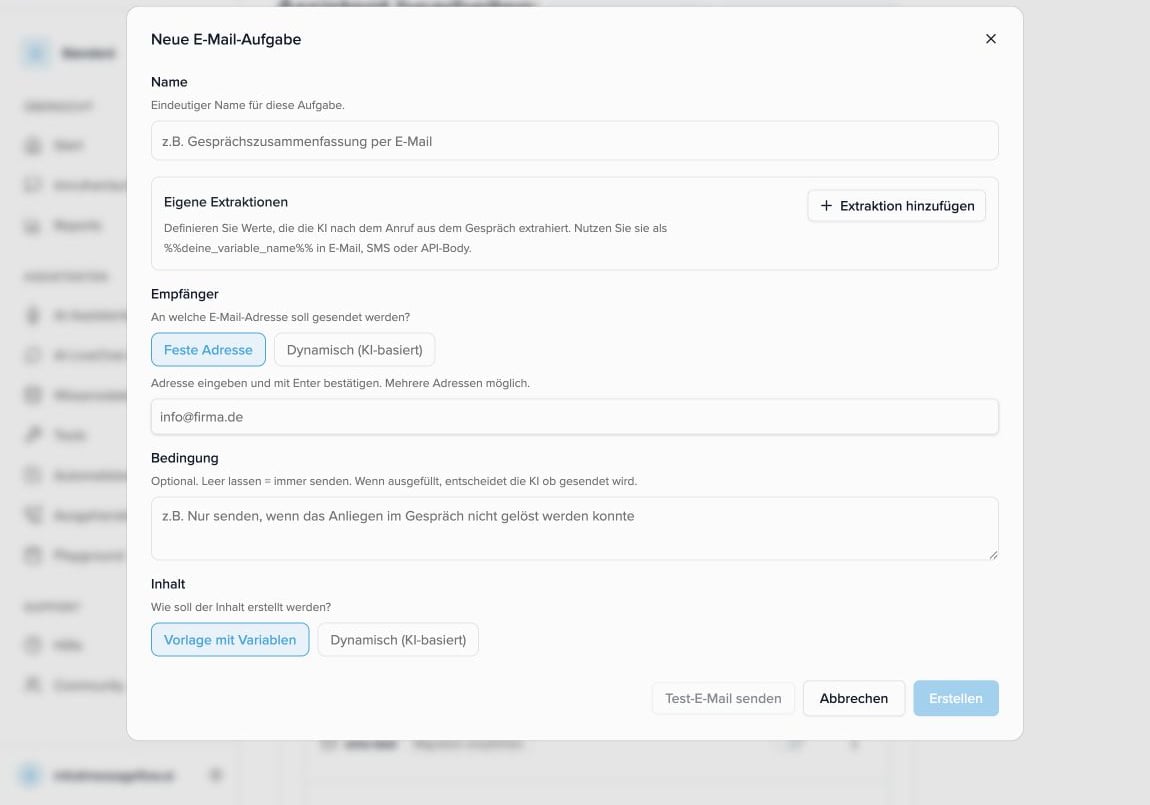
- Variable — the technical name you later use as a placeholder, e.g.
kunden_email - Extraction instruction — the description of which value the AI should extract from the conversation and how the value should be formatted
Usage notes:
- Formulate the extraction instruction as clearly and specifically as possible — the way you would explain it to a colleague who doesn’t know the conversation.
- There is no separate field for default values. If you need a fallback, write it directly into the extraction instruction, e.g. “If not mentioned, use
1890.” - In email and SMS content, custom variables are inserted as text.
- In the API request body, an empty result depends on the JSON context:
- Inside a JSON string:
"email": "%%kunden_email%%"becomes an empty string (""). - As an unwrapped value:
"year": %%erstzulassung%%becomesnull.
- Inside a JSON string:
- For strings, put the placeholder in quotes in the API body. For numbers or booleans, you can use the placeholder unwrapped if your extraction instruction is meant to return a matching value such as
1890,0,true, orfalse.
Configuring an API request
With an API task, the system automatically sends an HTTP request after every call to an external service of your choice. This lets you transfer conversation data directly into your own systems — without manual intermediate steps. When creating or editing an API task, you configure the following fields:- HTTP method —
POST,PUT, orPATCH - URL — target URL of the endpoint (
https://orhttp://) - Headers — key-value pairs;
Content-Type: application/jsonis prefilled by default
Request body
Usually a JSON object. Use variables (type%% to open the picker) — they are filled automatically after the call.
You can also use custom extractions in the API request body. For JSON strings, put the placeholder in quotes (
"%%kunden_email%%"). For numbers or booleans, you can use it unwrapped (%%erstzulassung%%) if your extraction instruction returns a matching JSON value.Inline extractions with <<...>> in the API body
For API tasks there is additionally an older inline syntax in the request body: <<...>>. It describes the extraction directly at the position where the value should be inserted.
%%kunden_email%%, because they are easier to read, find again, and edit later.
Authentication
Choose the authentication method your target service requires. Secrets (tokens, passwords, API keys) are stored encrypted and never displayed in plain text. None — No authentication header is sent. Suitable for public webhooks or services that handle authentication via the URL itself. Bearer Token — The most common method for modern REST APIs. The token is automatically sent as anAuthorization: Bearer <token> header. Enter only the token value.
API Key (Header) — The API key is transmitted in a freely definable header. Provide the header name (e.g. X-API-Key) and the key value.
Basic Auth — Authentication with username and password. Enter the credentials in the format username:password — the value is automatically encoded as an Authorization: Basic <base64> header.
OAuth 2.0 / JWT OAuth — For services like Google or Microsoft. Select a previously configured OAuth provider (Settings -> OAuth Providers). The system automatically fetches a valid access token before each request.
Condition (optional)
Works exactly like for email and SMS: after the conversation, the AI decides whether the request is sent. If you leave the field empty, the request is executed after every call. Examples:- “Only send if an appointment was booked.”
- “Only send if the caller placed an order.”
- “Only send if the issue could not be resolved.”
Creating a ticket
With the Create ticket task, your voice agent automatically creates a ticket after a call and links it to the conversation. This way every follow-up lands directly in your ticket list — without anyone having to record it manually. When creating or editing the task, you choose for each ticket field — Title, Description, Status, Priority, Group, Assigned user, and Due date — whether it gets a fixed value or is extracted from the transcript by the AI (Group and Assigned user can only be set as a fixed value). An optional condition lets you decide whether a ticket should be created after every call or only in specific cases.The complete step-by-step guide to the ticket task — including all fields, AI extraction, and tips for writing the prompts — can be found under Tickets in the section “Creating tickets automatically from conversations”.
Available variables
You insert variables into your email or SMS template — they are automatically replaced with the real values after the call. The easiest way: type%% in the text editor — a picker with all available variables opens automatically, and you can insert them with a click. Alternatively, the “Variable” button is available in the editor toolbar.
Conversation data
Date & time
Date and time variables are specified in JSON format. Timezone and language are adjustable — the defaults areEurope/Berlin and German.
Note: You don’t need to type the date and time variables manually — just select them from the
%% picker in the editor. The correct format is inserted automatically.Migrating old tasks
Older post-processing tasks that were created before the current version appear in the list with the note “Migration recommended”. These tasks continue to work, but they have no access to the new features (variable editor, conditions, testing). How to migrate an old task:- In the task list, click the three dots to the right of the old task.
- Select Edit / Migrate.
- In the migration dialog, you see the old configuration as a reference (grayed out, not editable).
- Reconfigure the task in the modern format: recipient, content, condition.
- Click Save and Migrate. The new task is created and activated automatically — the old task is deactivated at the same time.